Fought At The Gallery Maze: The Chimneys
1671 days 20 hours 47 minutes ago
Combined Army Repels Assisting PanOceanian Forces
300 POINTS"Commander Berithh!" a voice rang over the intercom in the commander's office.
"Yes, Lieutenant?"
"Sir, we've received an urgent request from our Aleph allies. EI forces have been detected moving towards the Gallery Maze, but their own forces are engaged elsewhere. They are requesting we send a reactionary force to assist."
"Acknowledged. Lieutenant, liaise with our allies in the Military Orders, and requisition support of the Knightly Orders. Once you have your answer from them, take your squad and move out immediately. The Combined Army cannot be allowed to make any further advances on the Human Sphere.."
"Roger that, Sir."
Berithh stood from his chair, and made his way towards his holo-display. Its dull blue light illuminating the room, Berithh began switching through available tabs of tactical display. Between the constant assaults on Liberty Cargo, he scarcely had the necessary forces to deploy elsewhere on the station. Would the Military Orders be able to provide forces to help out his squads? As he lit a cigarette, he pondered the next course of action for the forces under his command.
Both Corrick and myself are relatively new players to Infinity, having been playing for less than one year each.
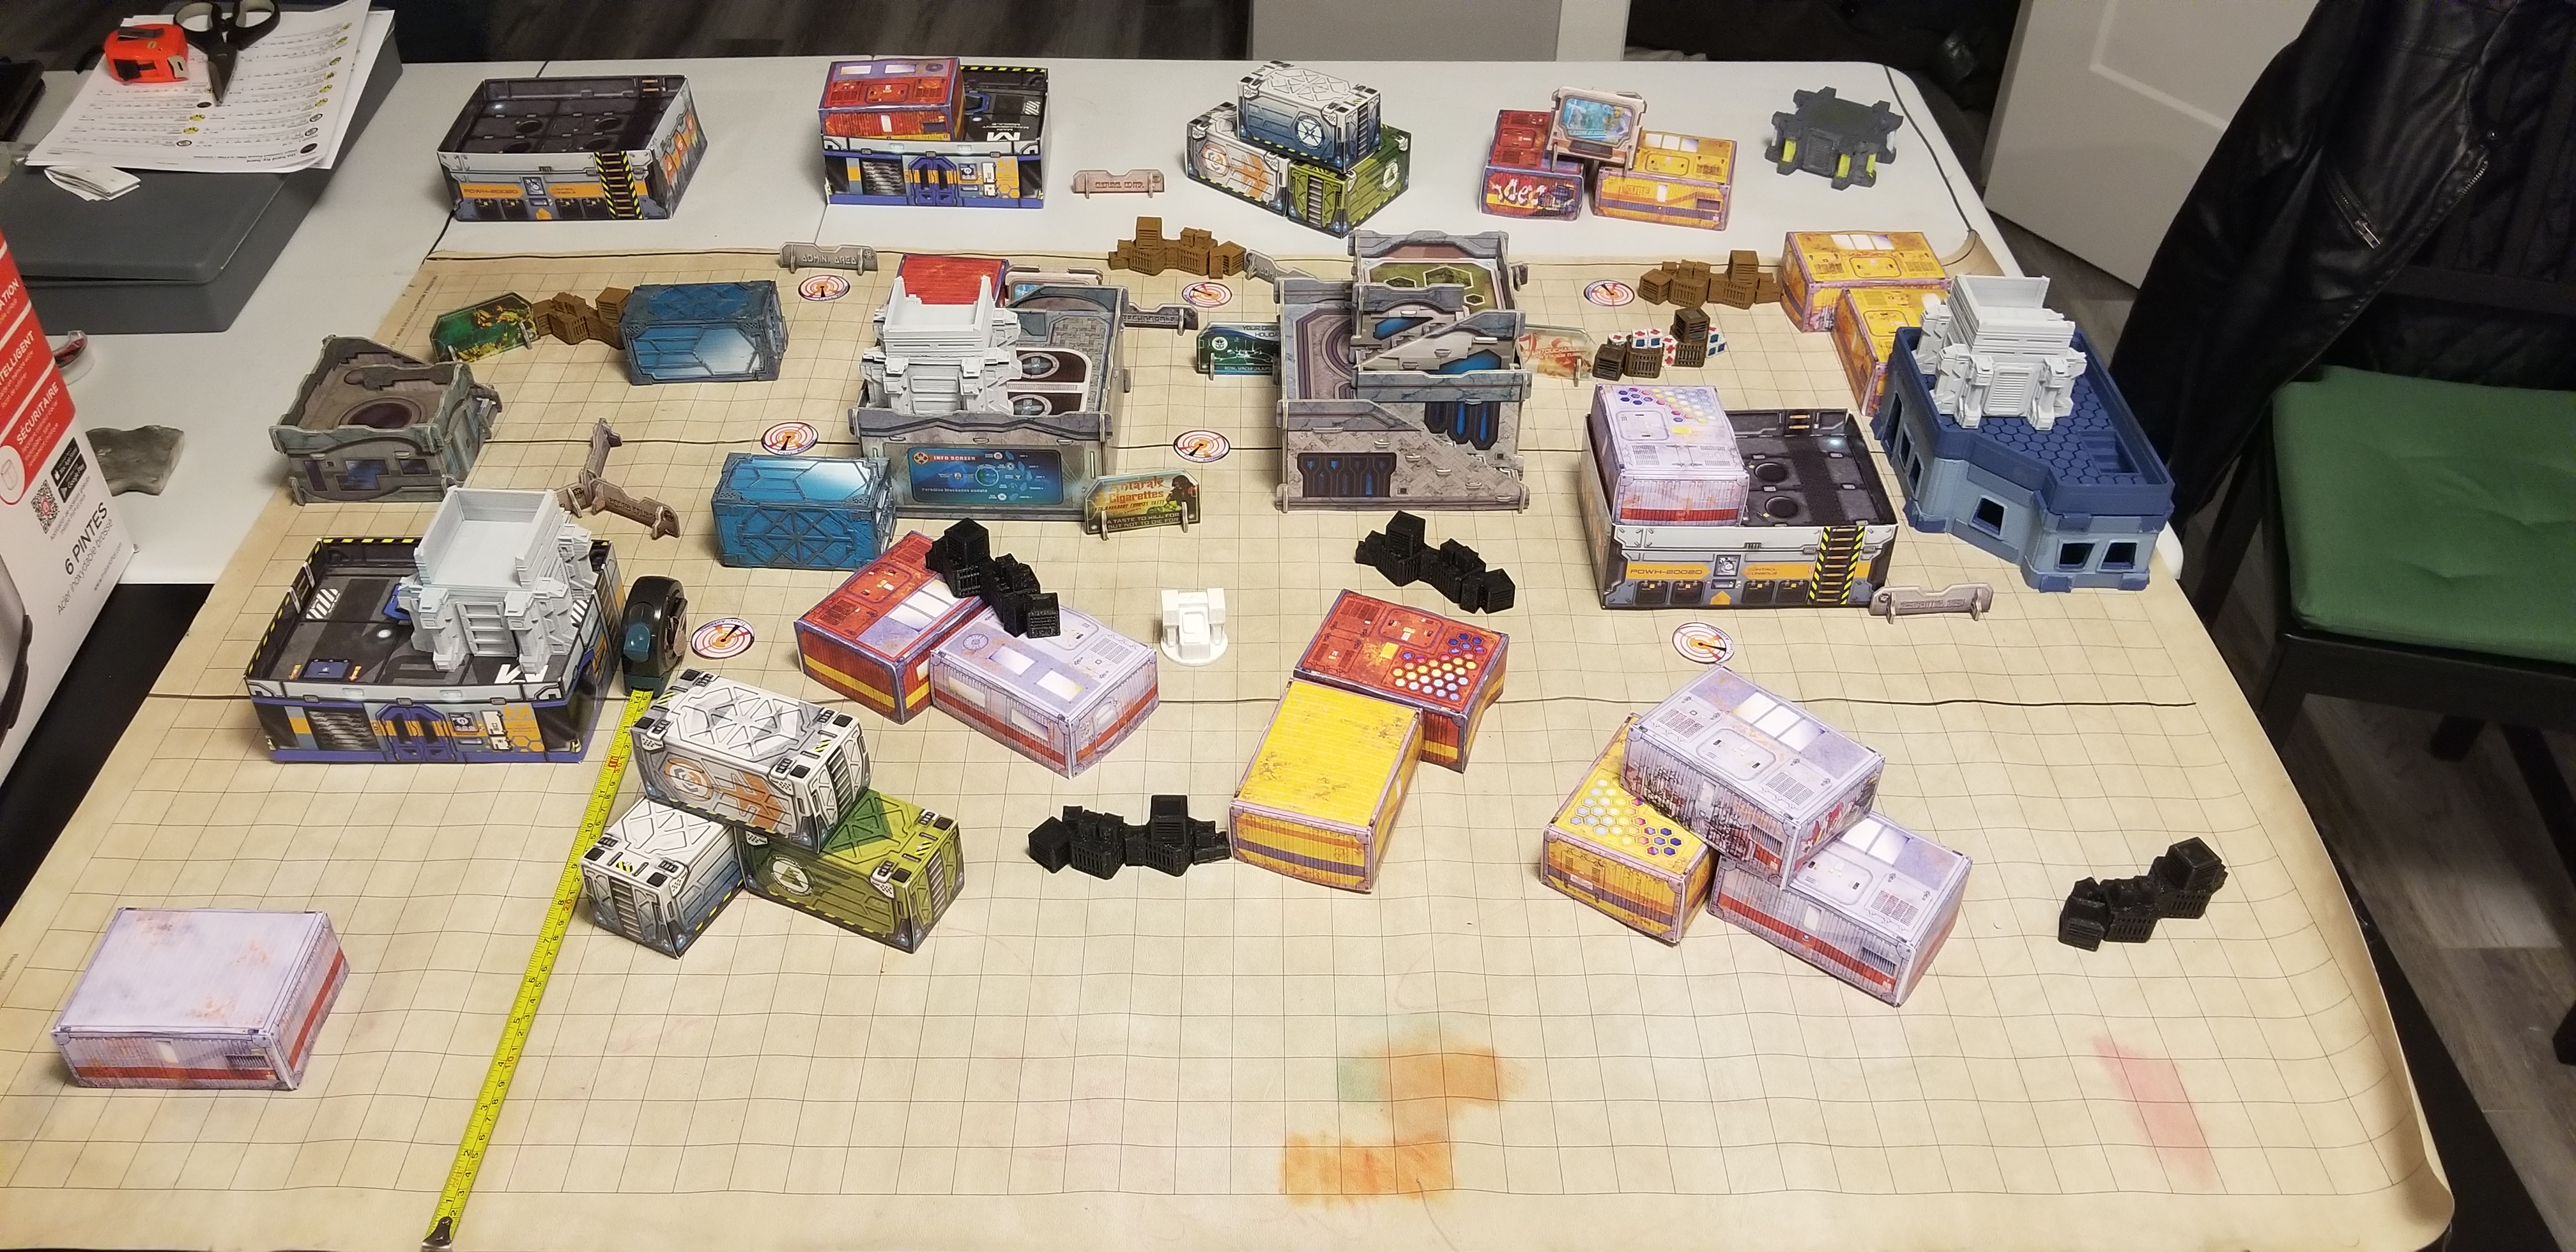
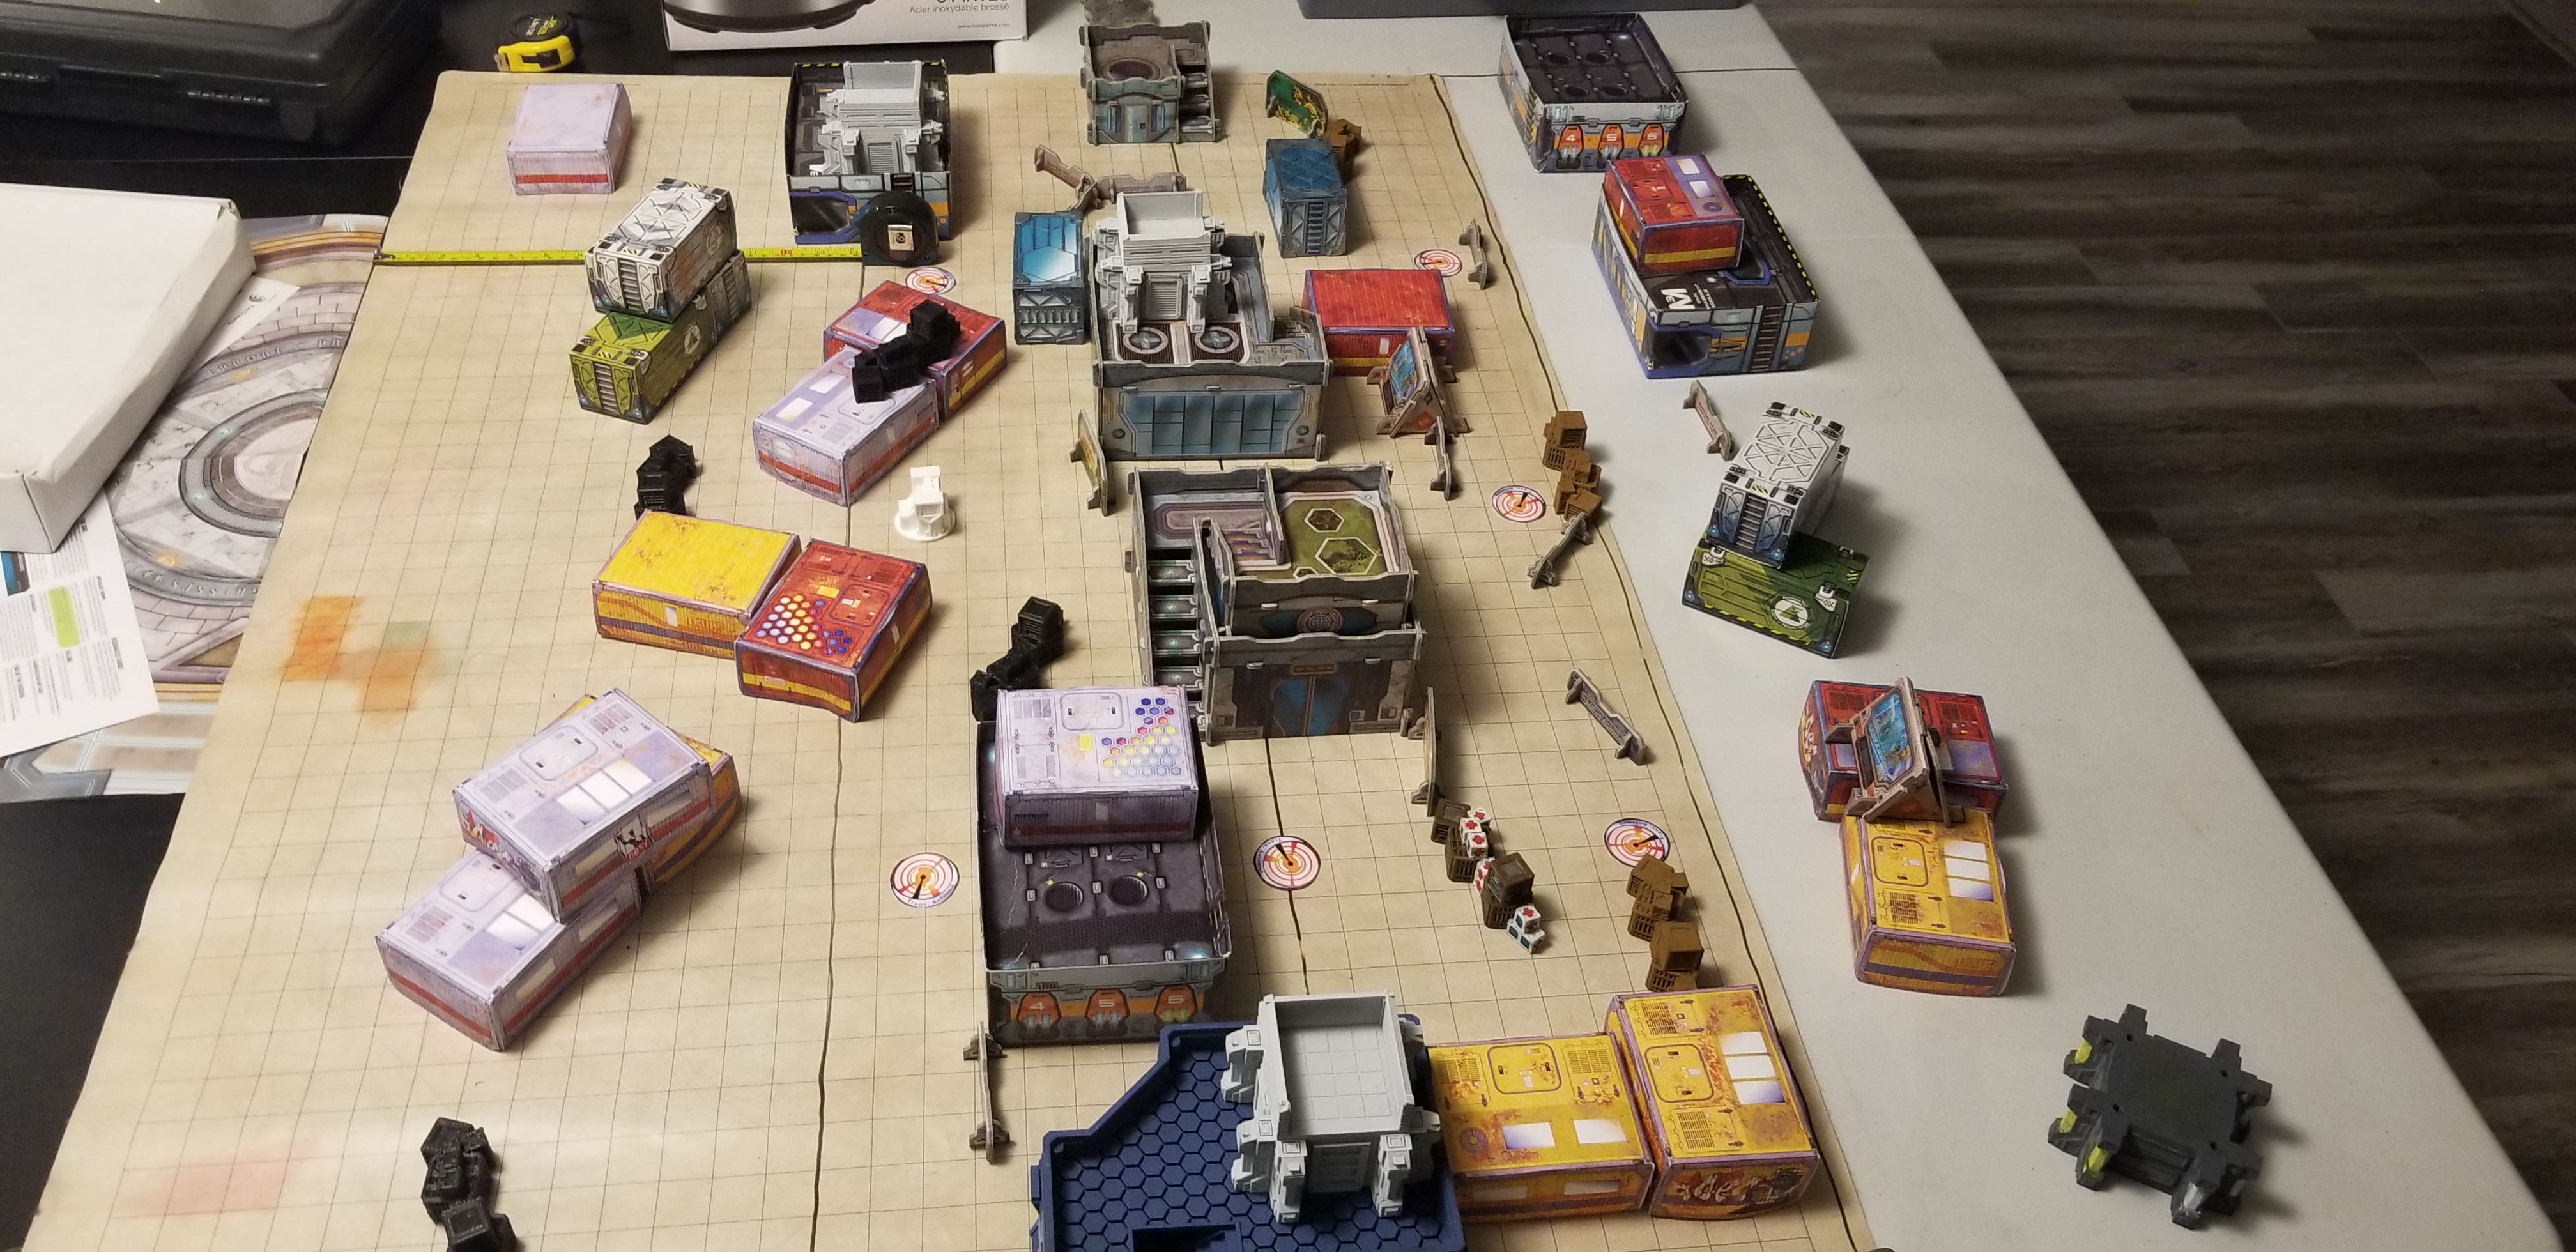
I can say with confidence, this mission presented us both a challenge with list building. It was our first time playing The Grid, it was our first time using Hostile Environment rules, and it was our first time using saturation zones outside of the odd Nimbus Grenade.
I can't speak to Corrick's plan with making his army, though I can speak to mine. My intention would be to have at least 3 units with D charges, to be able to go down each "lane" of towers, capture, and destroy them. Additionally, I wanted a data-tracker who would be able to seek out and destroy the enemy HVT relatively easily.
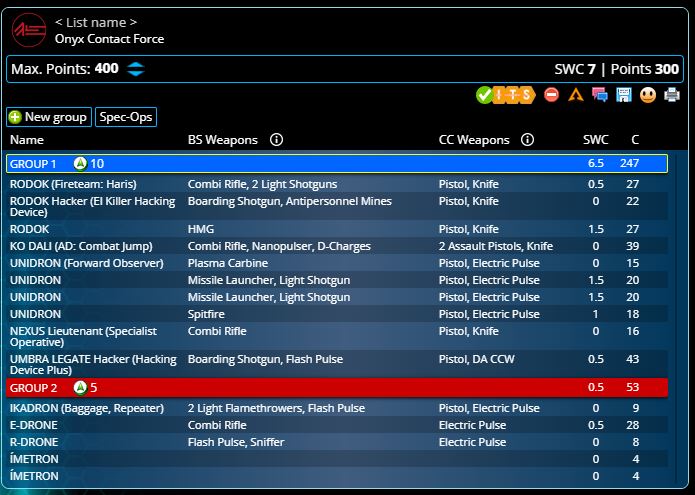
For that, the following list was created;

My intention would be to push Patsy down one lane, the Knight of Santiago down another, while the Monstrucker took the final lane. The Nisse and Bulleteer were there to elimate threats, and the Knight Hospitaller Doctor, with his Palbot, would be able to try meleeing the towers.
The Mobility armour suit of armour for Joan, in her non-LT profile, was chosen to be the data tracker. The intention was that she would be my held back model, and that I would deploy her accordingly to hunt down the enemy HVT.
With that, let's get to the game.
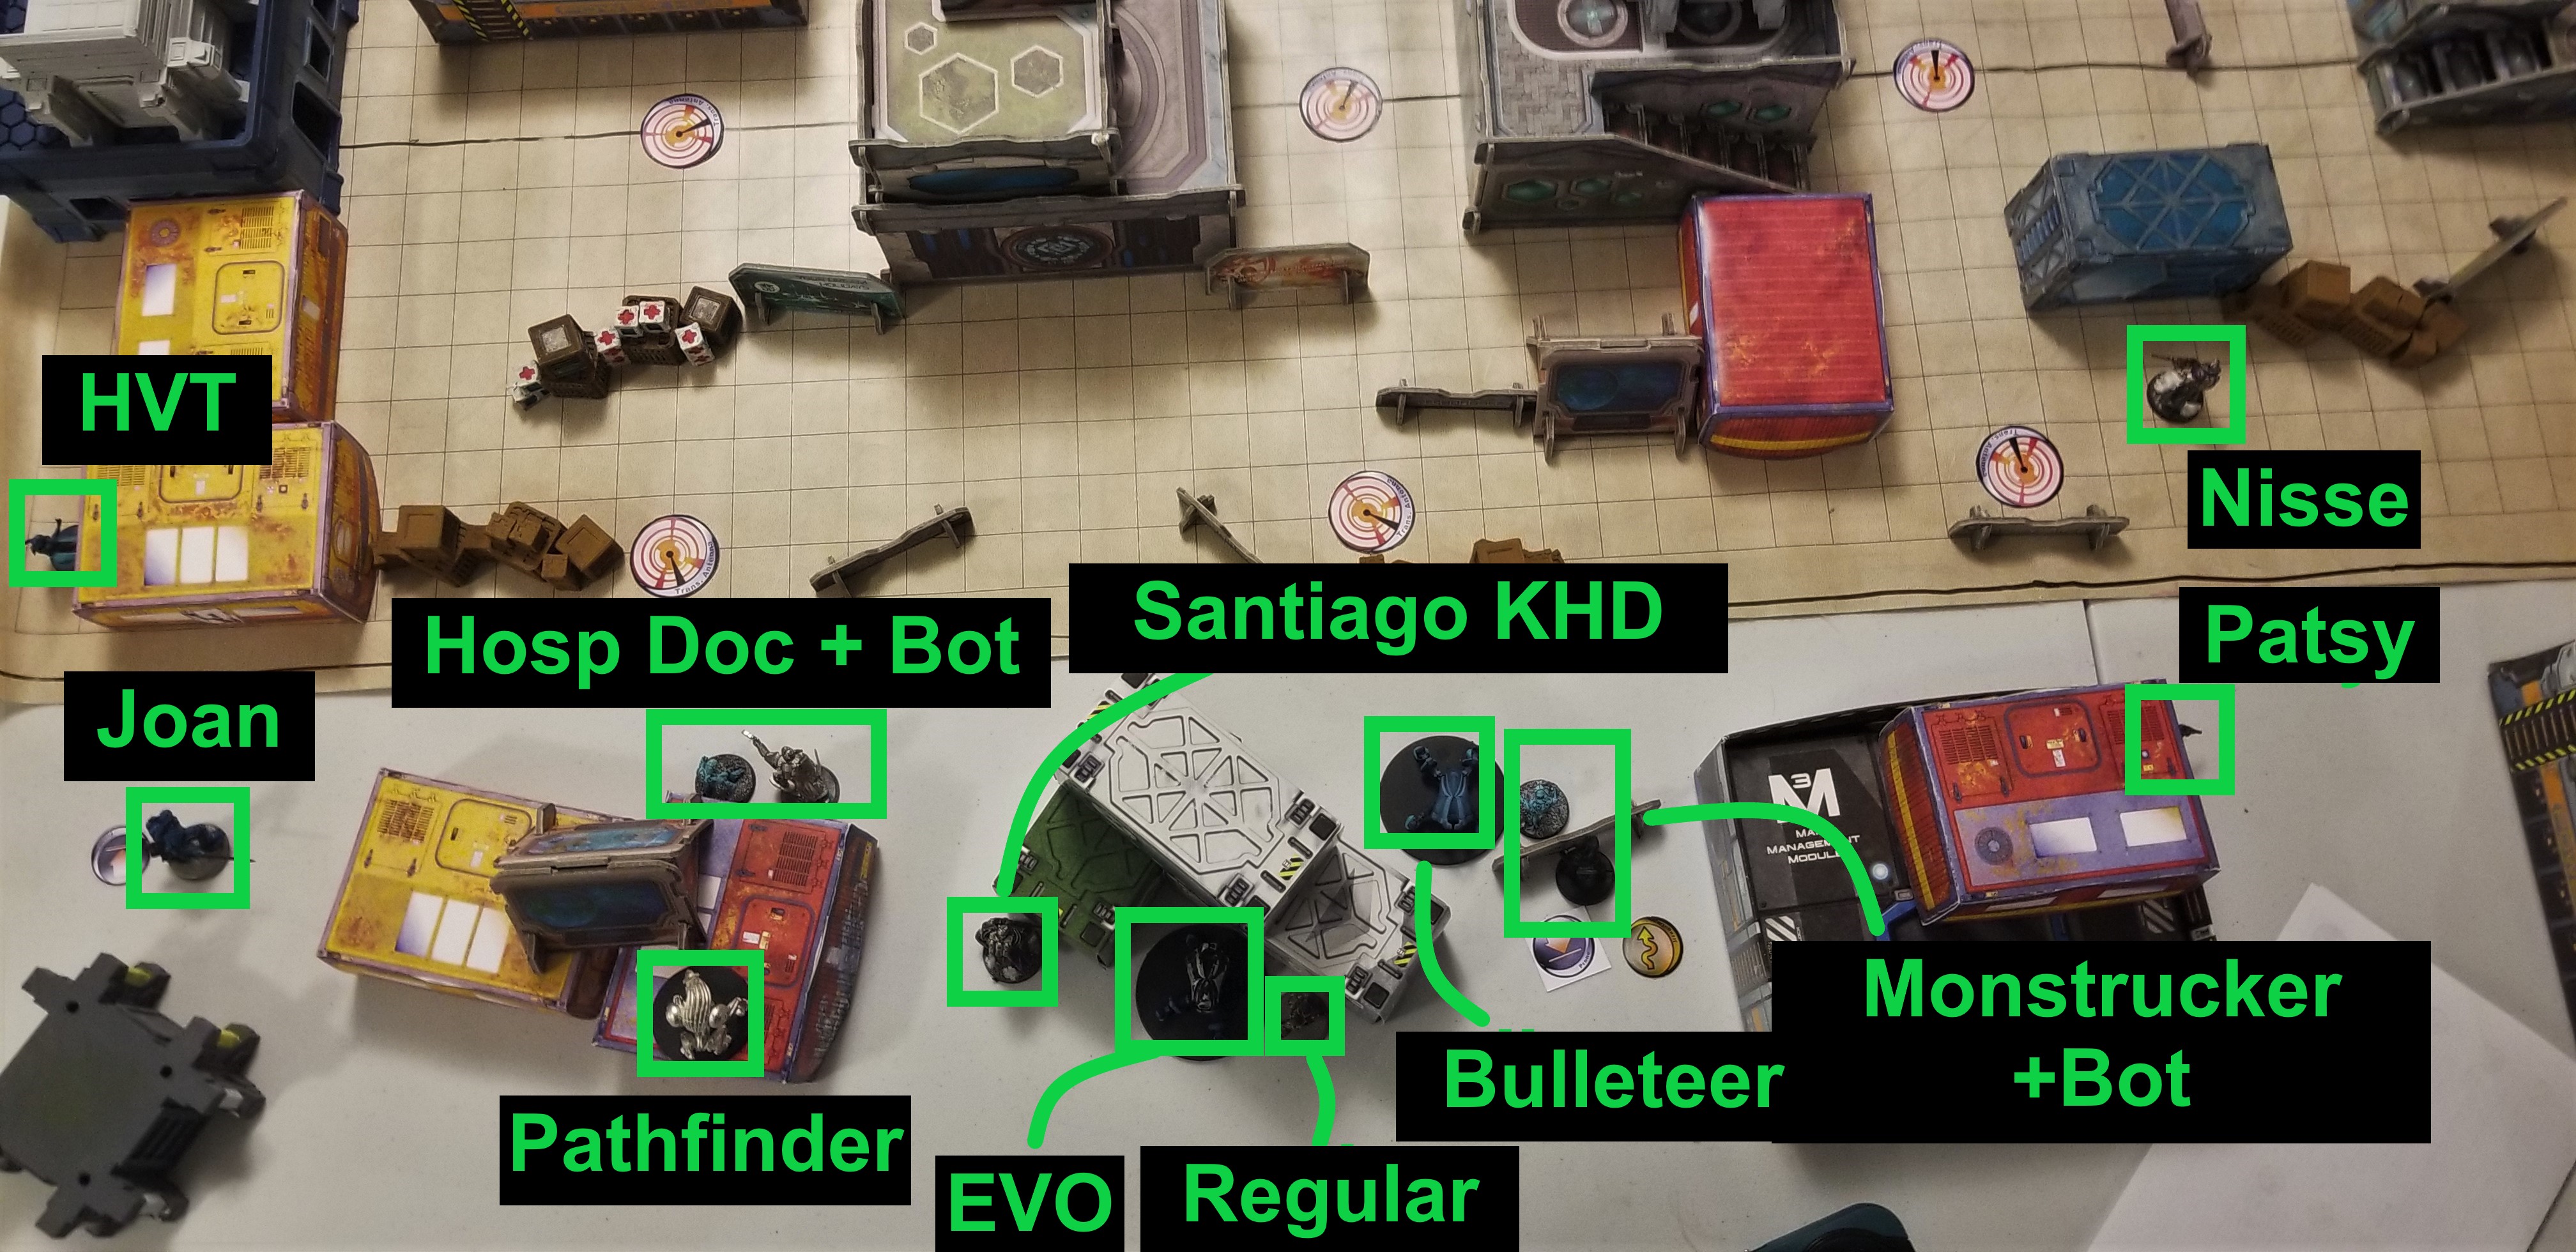
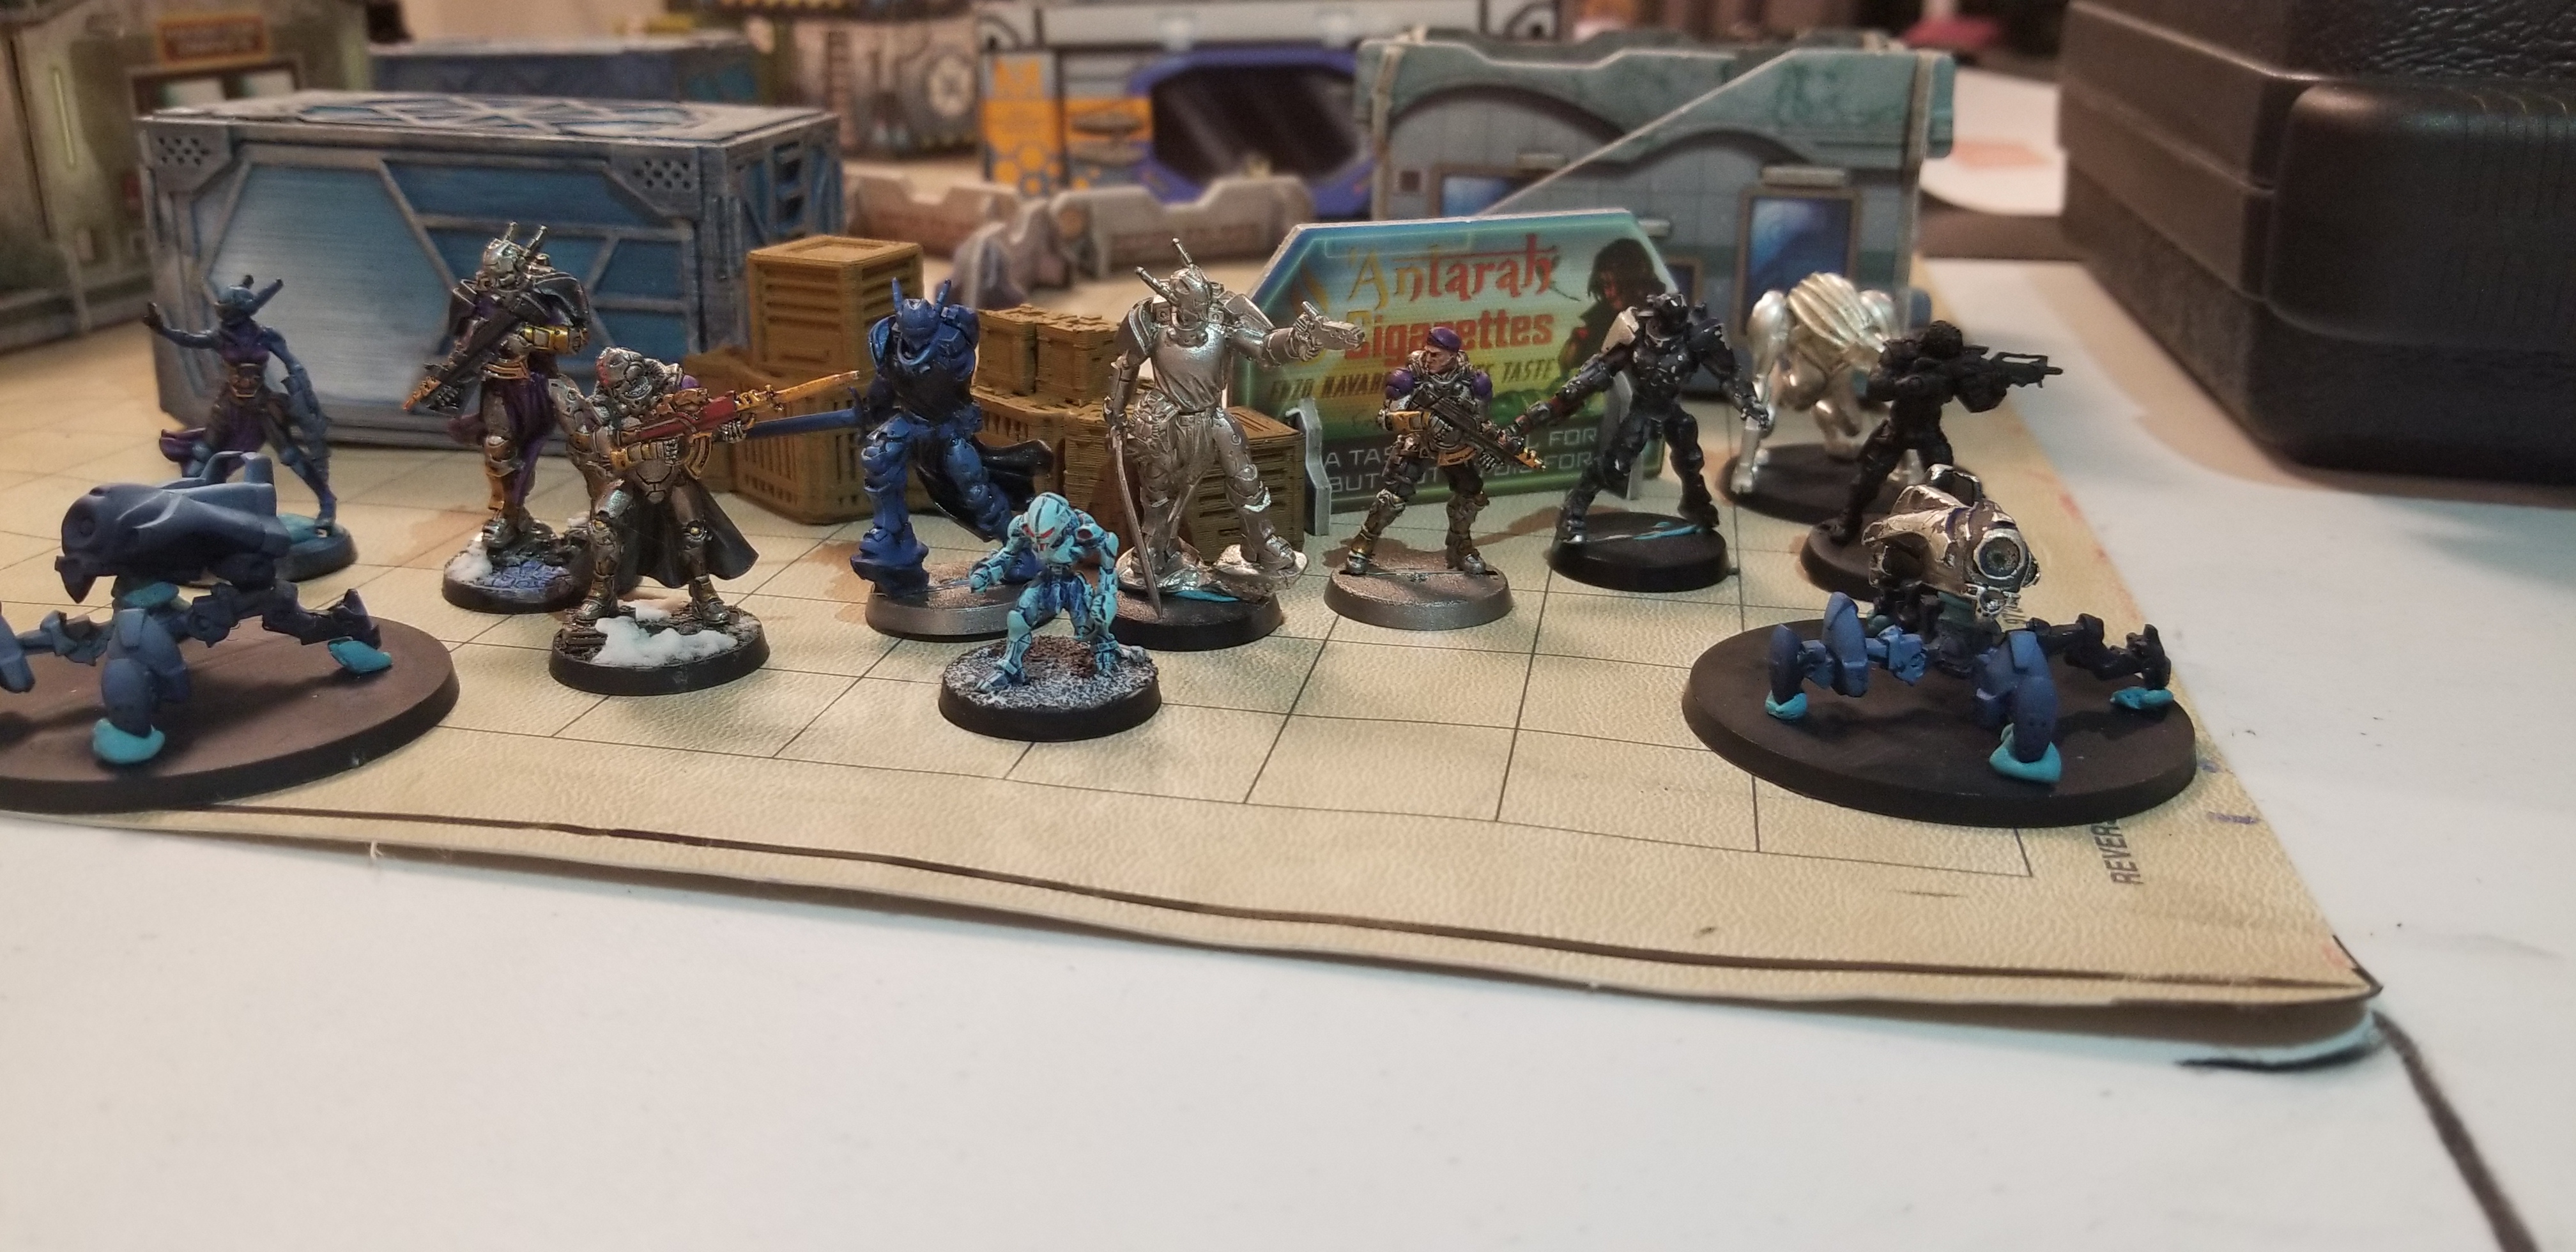 PanOceanian forces (L-R): HVT (Order Sergeant Hacker), Bulleteer, Knight of Santiago Hacker (Proxy, BSG Hospitaller), Nisse HMG (Proxy, Nisse Sniper), Joan Mobility Armour (Proxy, Hospitaller with one arm), Palbot, Hospitaller Doctor, Regular (Proxy, Fusilier), Patsy (Proxy, Orc Multi), Pathfinder (Proxy, Sirius Bot), Monstrucker (Proxy, Aguicil) Mulebot-EVO (Proxy, Bulleteer). Not pictured: Second Palbot.
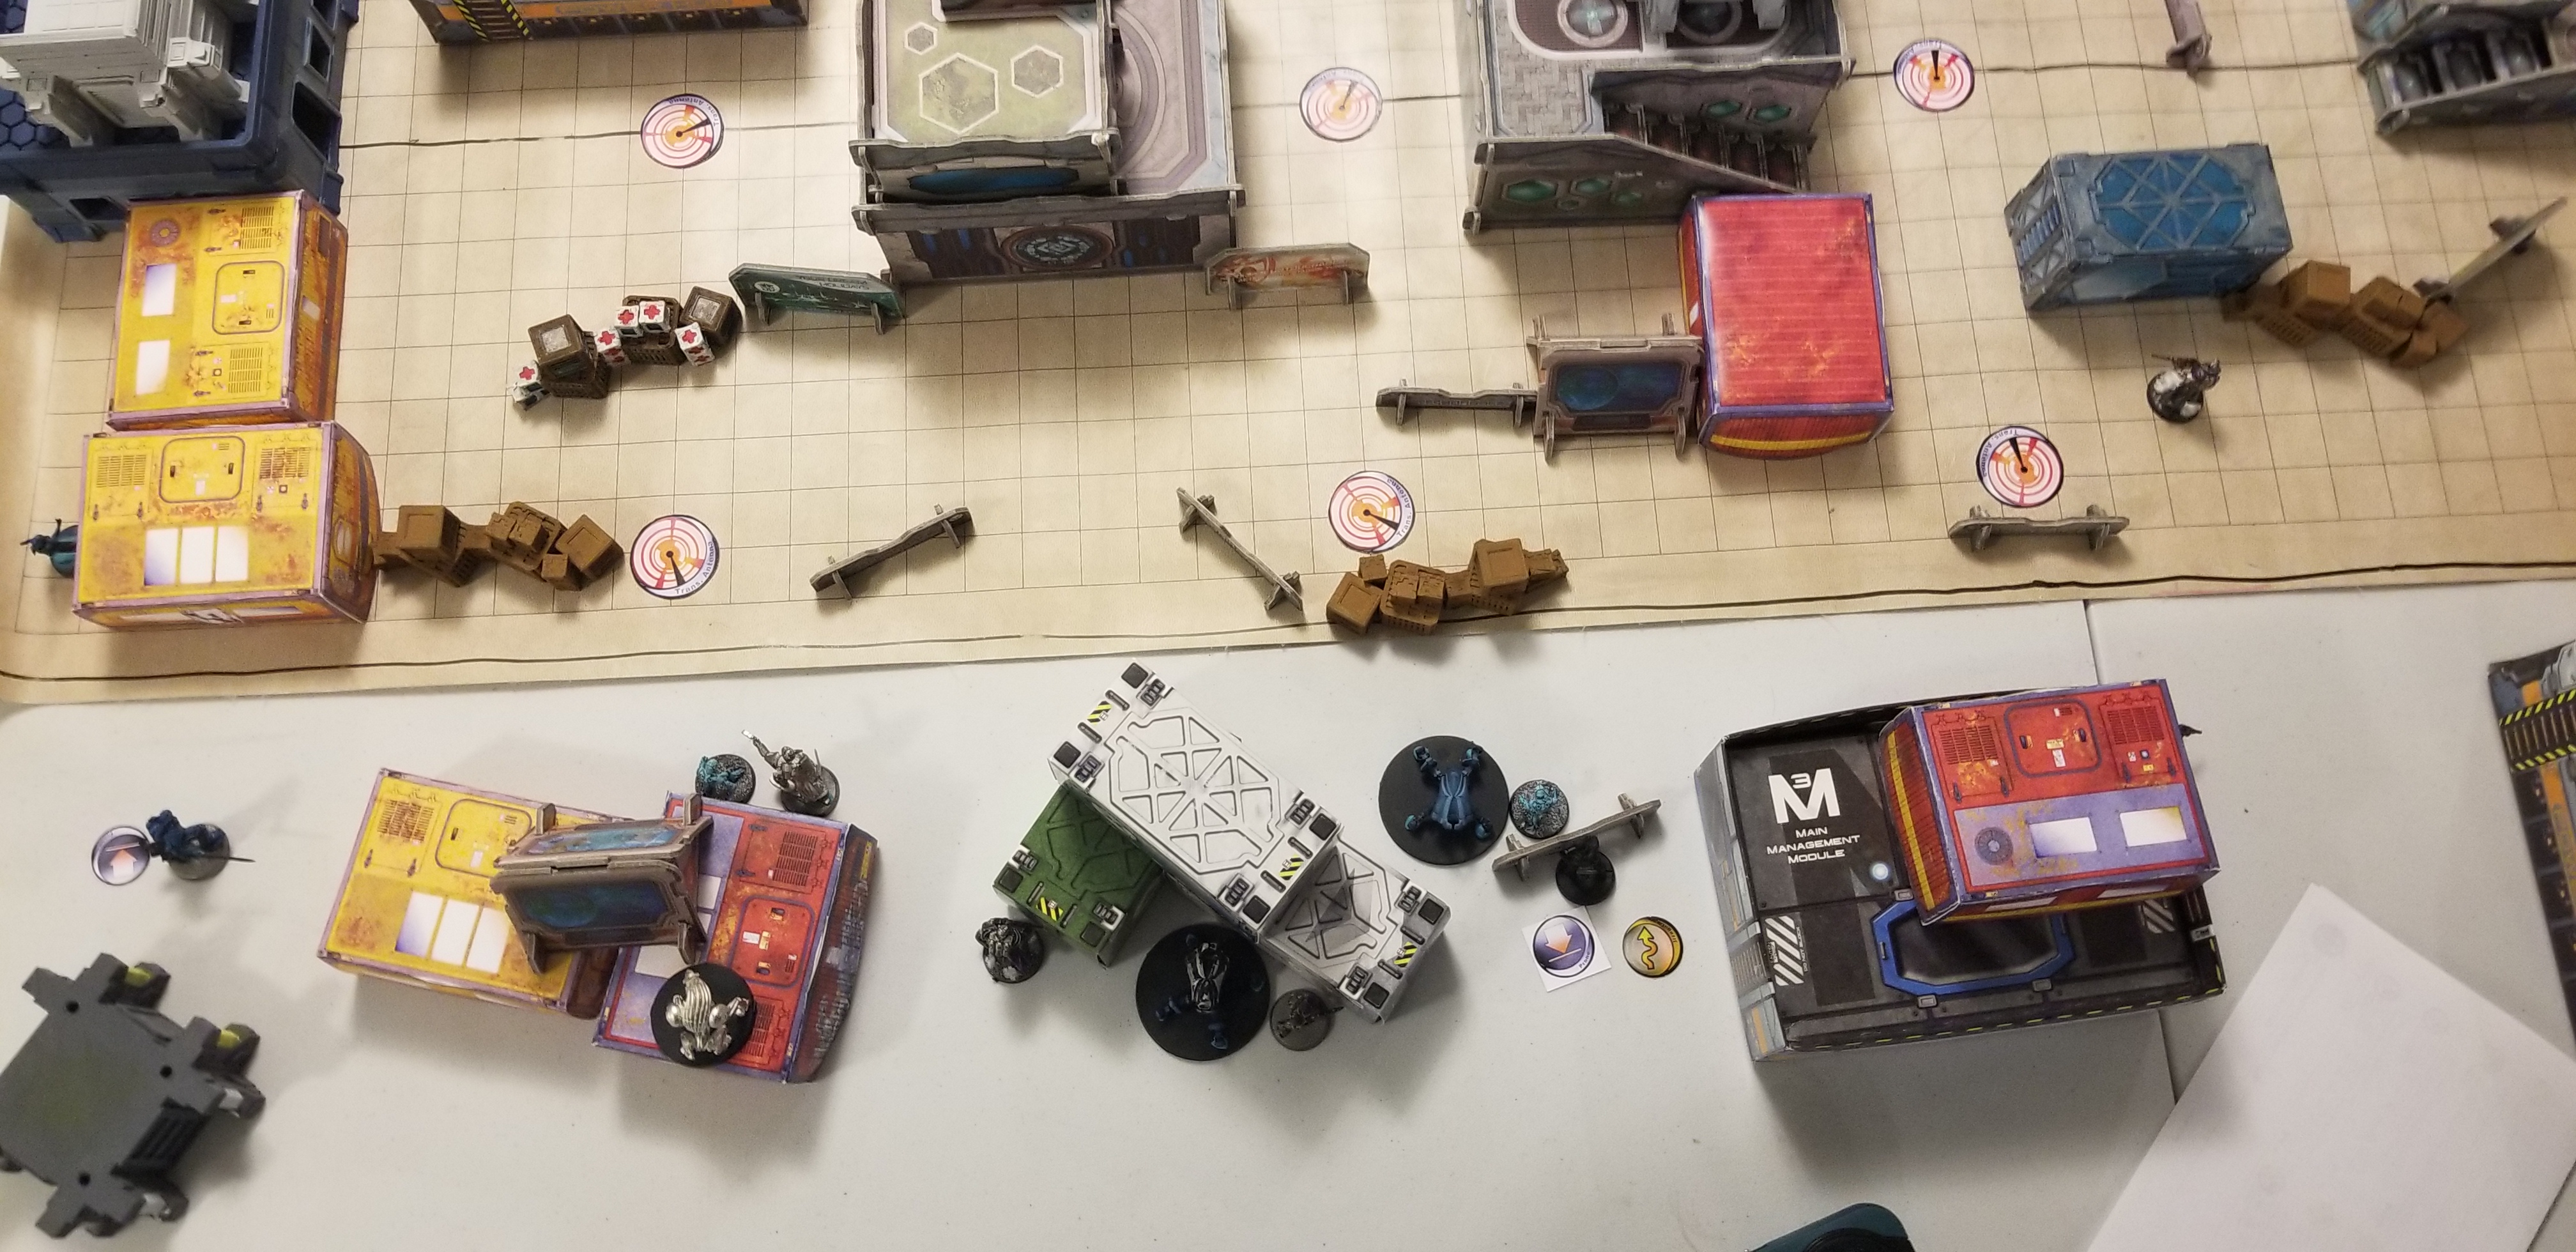
PANOCEANIA: TOP OF TURN 1
"Status report!" the Lieutenant radio'd to his forces.
"The enemy has been spotted. The Combined Army forces seem to be predominately Morat and Drone based, Sir. We've spotted a Unidron with missile and R-Drone overlooking our right flank, and sensors indicate they have more forces held back out of our line of fire." The Svalarhiema Nisse replied.
"I want you to deal with those drones on our flank, everyone else, I want you to secure the positions closest to us. If need be, deploy the Bulleteer to assist on the right flank!"
With the Nisse already in a position to try to overcome opposition on the right flank, he moves forward into cover. Peaking out from cover in a position to see the R-Drone and nothing more, the Nisse begins his assault. Easily overpowering the R-Drone, the Nisse moves himself to a better angle of cover, able to fire upon the Unidron Missile launcher. Unfortunately for him, he wildly misses the Unidron, and is hit with a missile in return, killing him instantly.
Unable to allow the Missile Launcher to continue covering the lane, the Bulleteer swings into action. Receiving Assisted Fire from the allied EVO-Mulebot, the Bulleteer moves into position and guns down the Unidron.
With all immediate threats neutralized, Patsy and the Hospitaller Doctor go and secure the towers closest to them. Patsy fastens a D-Charge to the tower, while Joan moves towards the PanOceanian HVT and enters suppressive fire, protecting from suspected enemy airborne infiltration.
 While the Nisse was able to overpower the R-Drone, he failed to do the same to a Unidron missile launcher, and is killed in the resulting explosion.
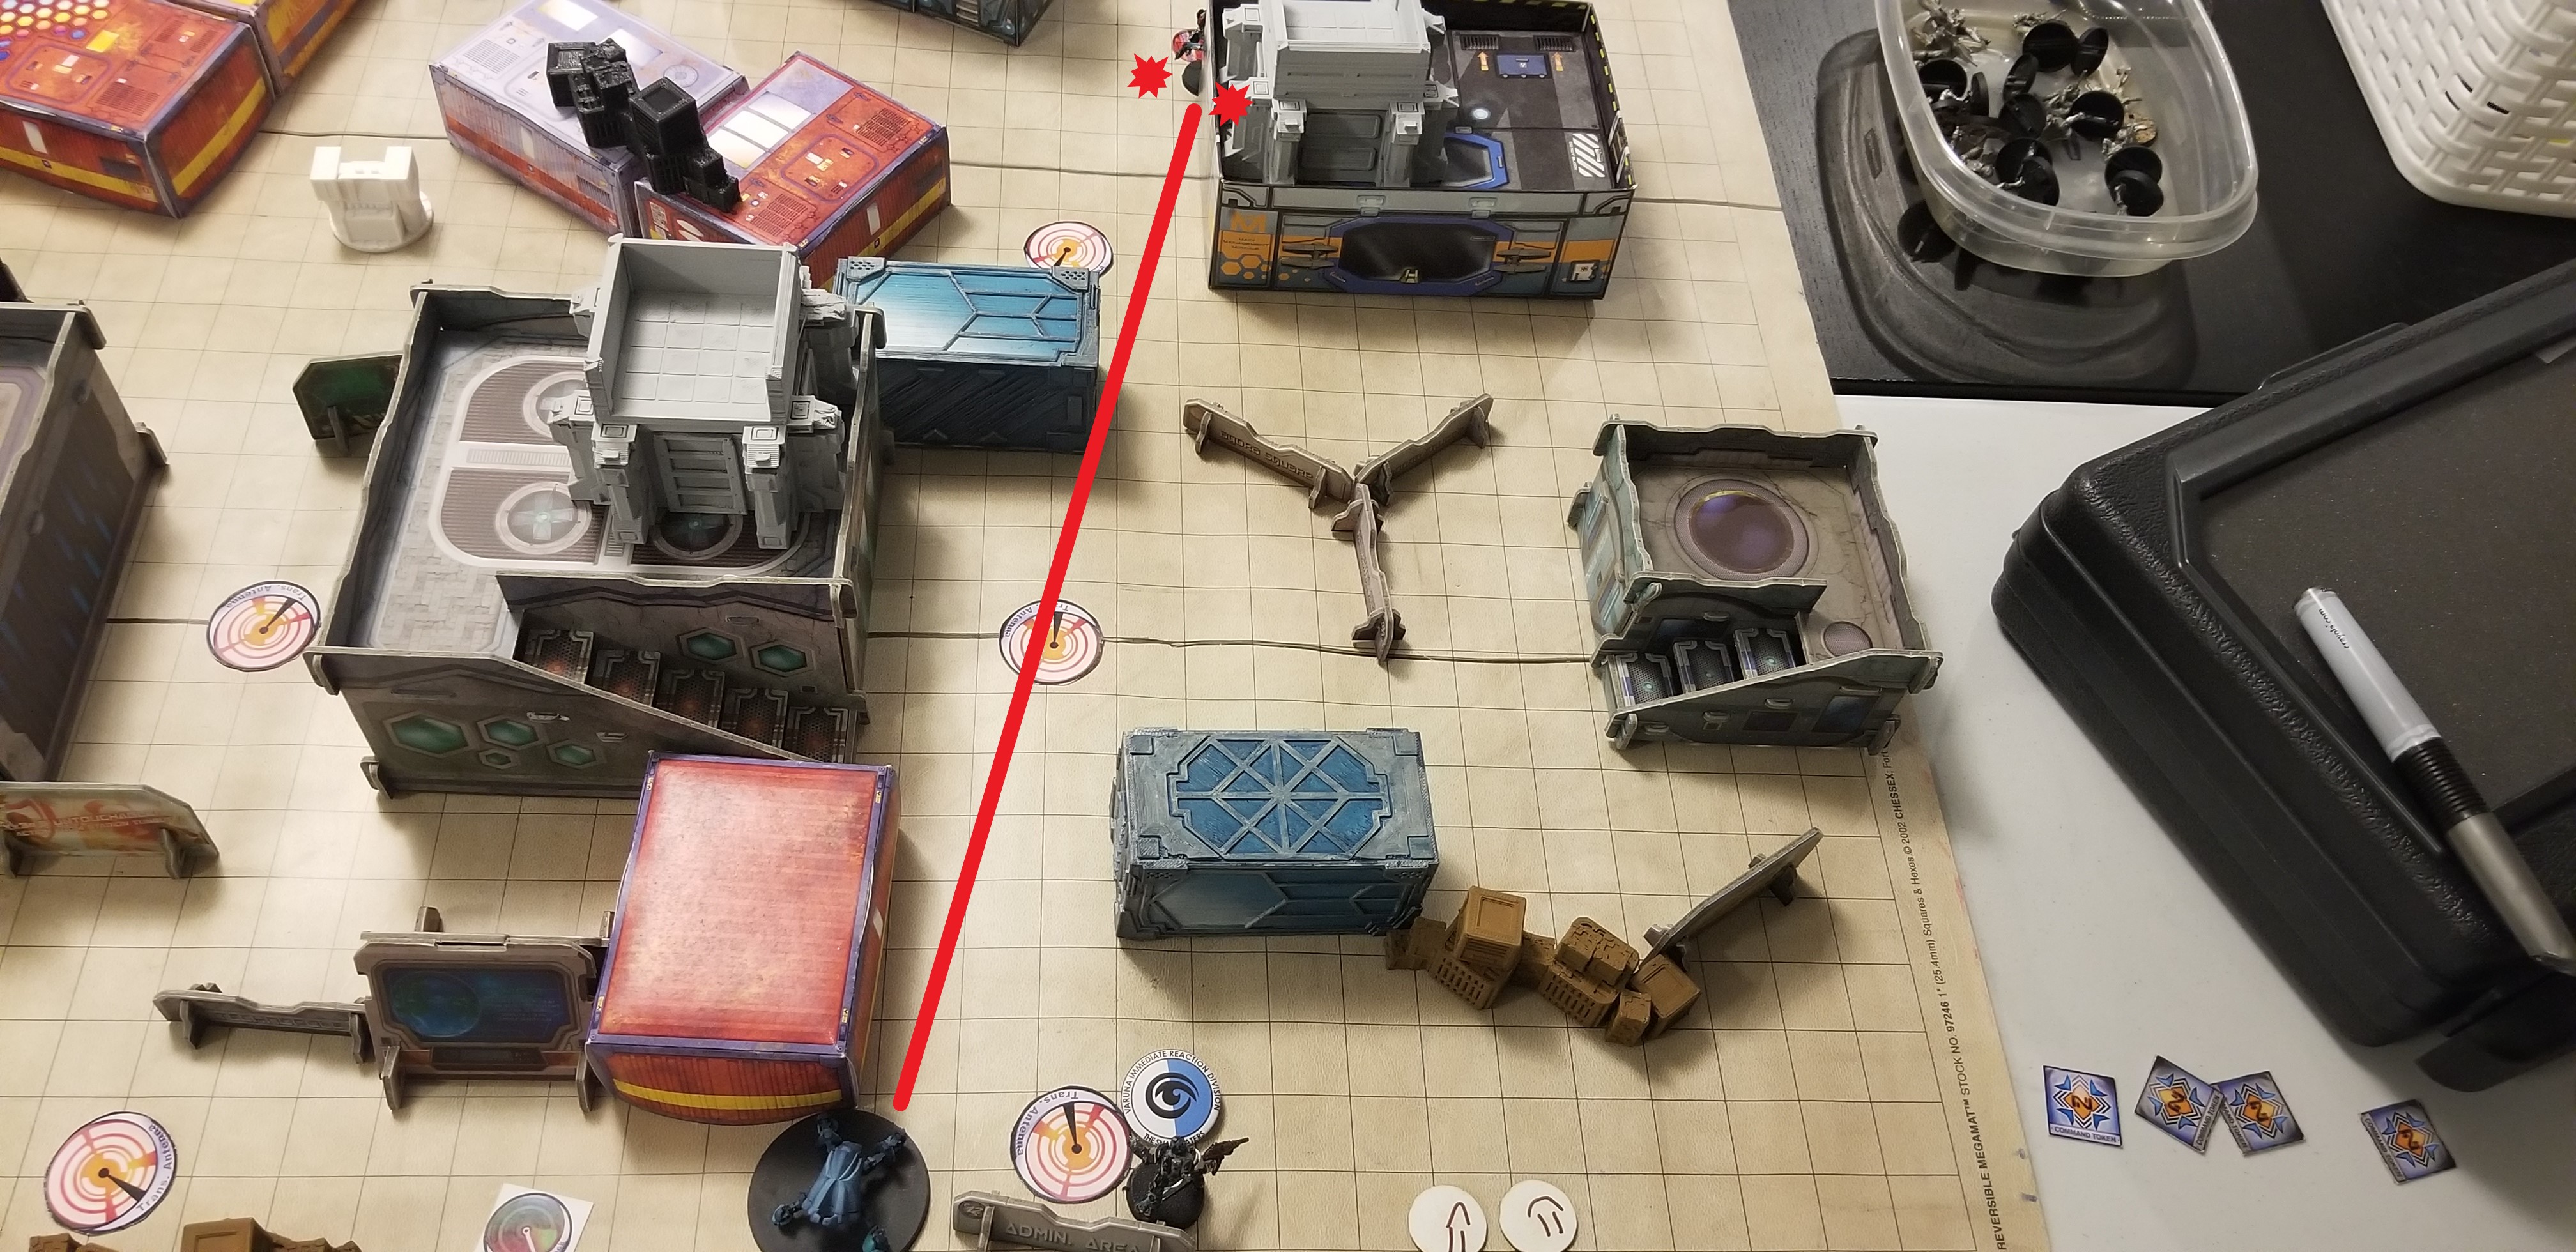 The Bulleteer moves forward to elimiante the Unidron ML, while Patsy moves to the nearest tower and captures it.
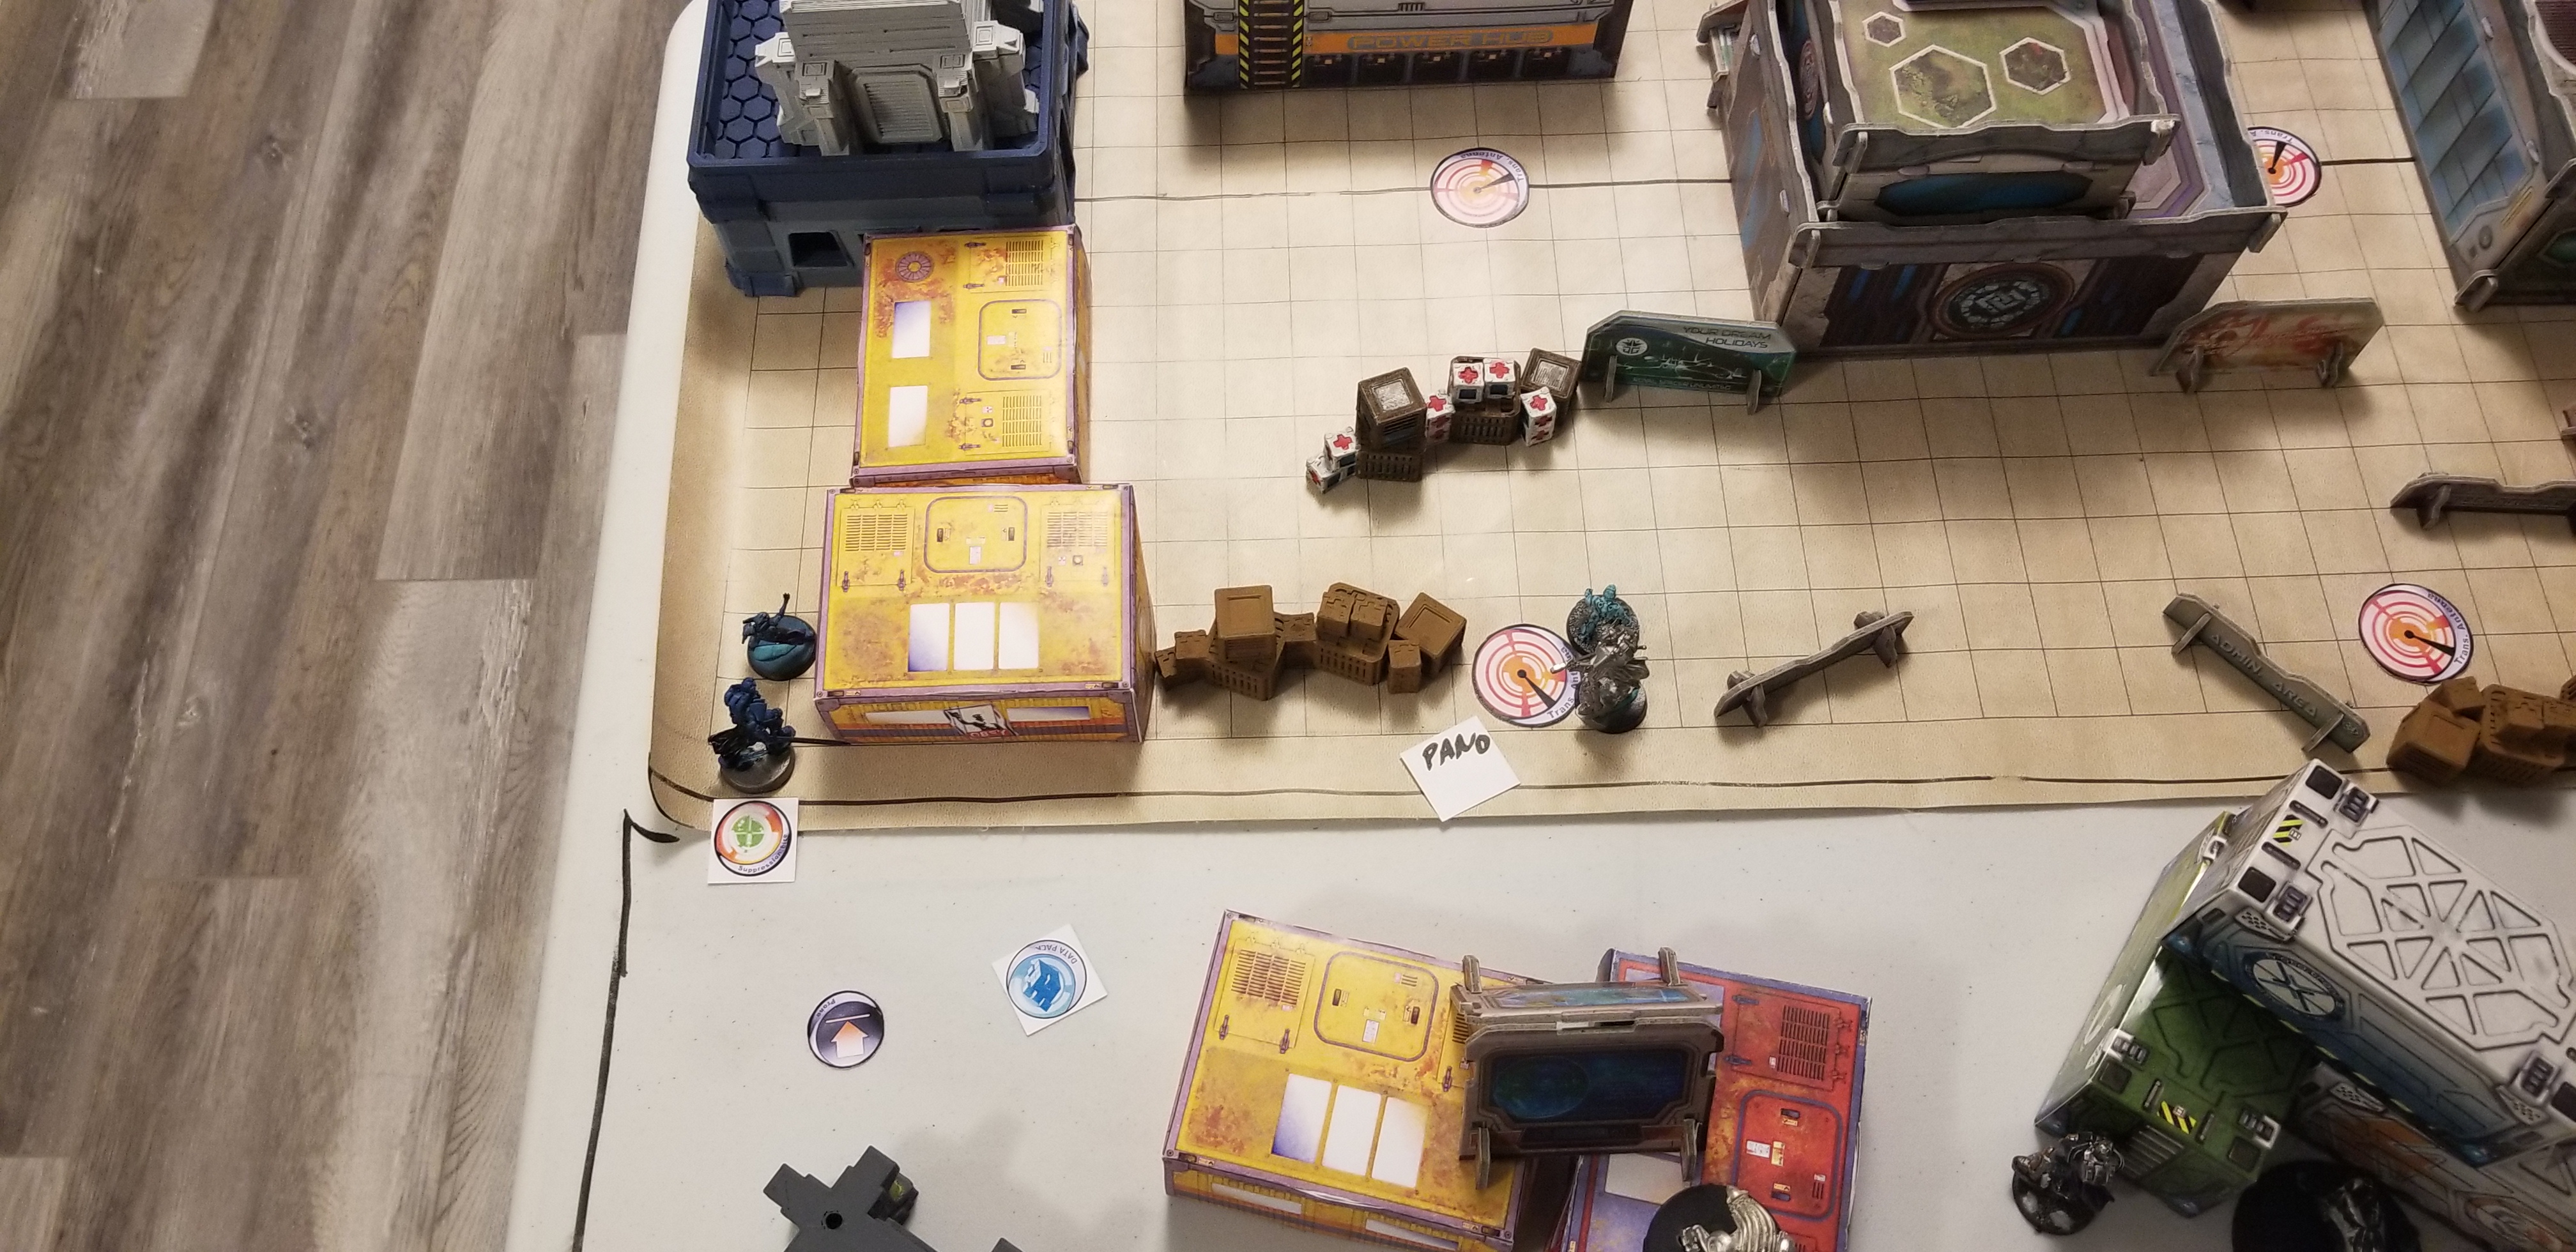 The Hospitaller Doctor moves to secure the objective on the left flank, while Joan goes to protect the HVT.
COMBINED ARMY: BOTTOM OF TURN 1
The Combined forces advance towards the PanOceanian line, with the Rodok fireteam leading the charge. Jumping atop a small building, the link leader armed with Heavy Machine Gun engages through the saturation zone, firing upon the Pathfinder Bot. Unable to flash pulse in time, the Bot falls to the weight of fire from the Rodok. Advancing slightly to gain a better shot, the Rodok opens fire upon the Hospitaller Doctor. Though a fierce fightfire ensues, the Hospitaller gets knocked unconscious by the HMG.
With the two PanOceanian casualties, the back line of the Combined Army's forces stirred to life. A link team of Unidrons move to a more advantageous position, and claim objectives from afar with their Foward Observers.
PANOCEANIA: TOP OF TURN 2
"I need a casualty report." the Regular asked.
"Sir, we've sustained two human casualties, and a drone was destroyed." The knight of Santiago replied.
"We need to focus our efforts on securing as much data as we can. Once we have it, destroy the terminals so the EI forces aren't able to get it!"
"Acknowledged."
The turn begins with Patsy detonating her planted D-Charge on the Antenna, denying the aliens precious information. She then moves forward and grabs the next objective using her forward observation skills. However, after planting two D-Charges on it, the Antennas reinforced armour had not yet crumbled. Unable to do anything more, Patsy runs to cover.
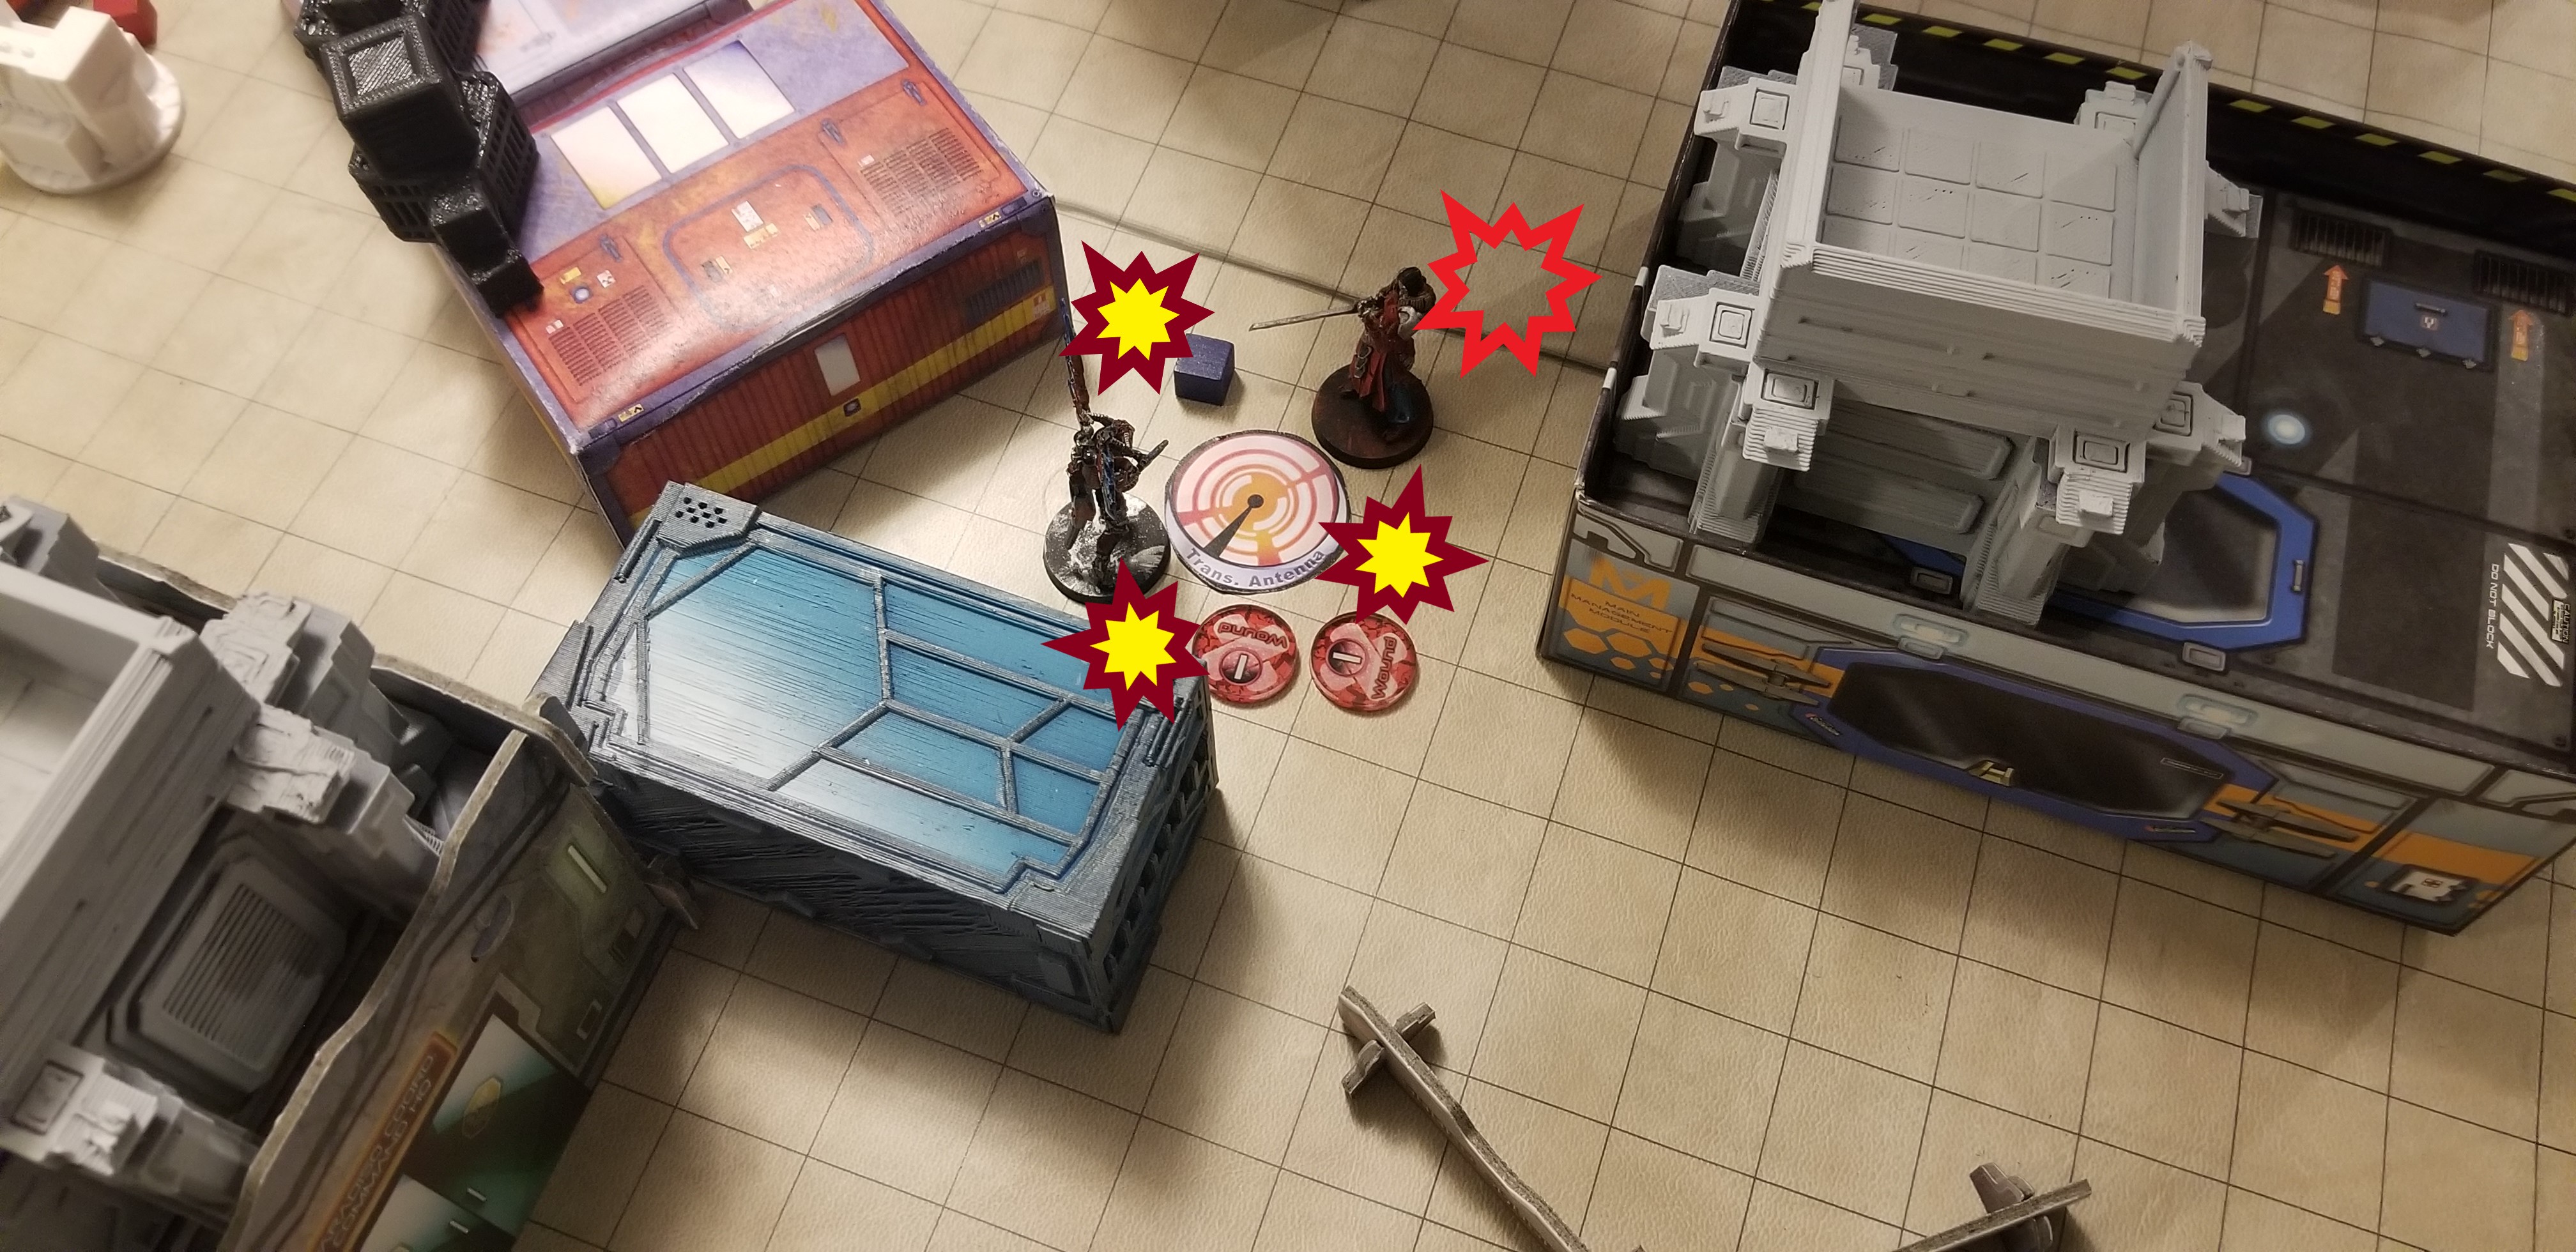
Concurrently, Joan springs forth from where the HVT was, running into the line of fire of both a Rodok and E-Drone. Splitting the fire of her Spitfire between them, Joan is able to overcome both, and move into contact with the Antenna tower nearest her. It takes her three swings with her Explosive Close Combat weapon to destroy the tower!
Short on time before the Combined Army would react, Joan moves into cover to protect herself from oncoming fire.
 With a single D-Charge planted in turn 1, Patsy is able to detonate the Antenna on the PanOceanian lower right.
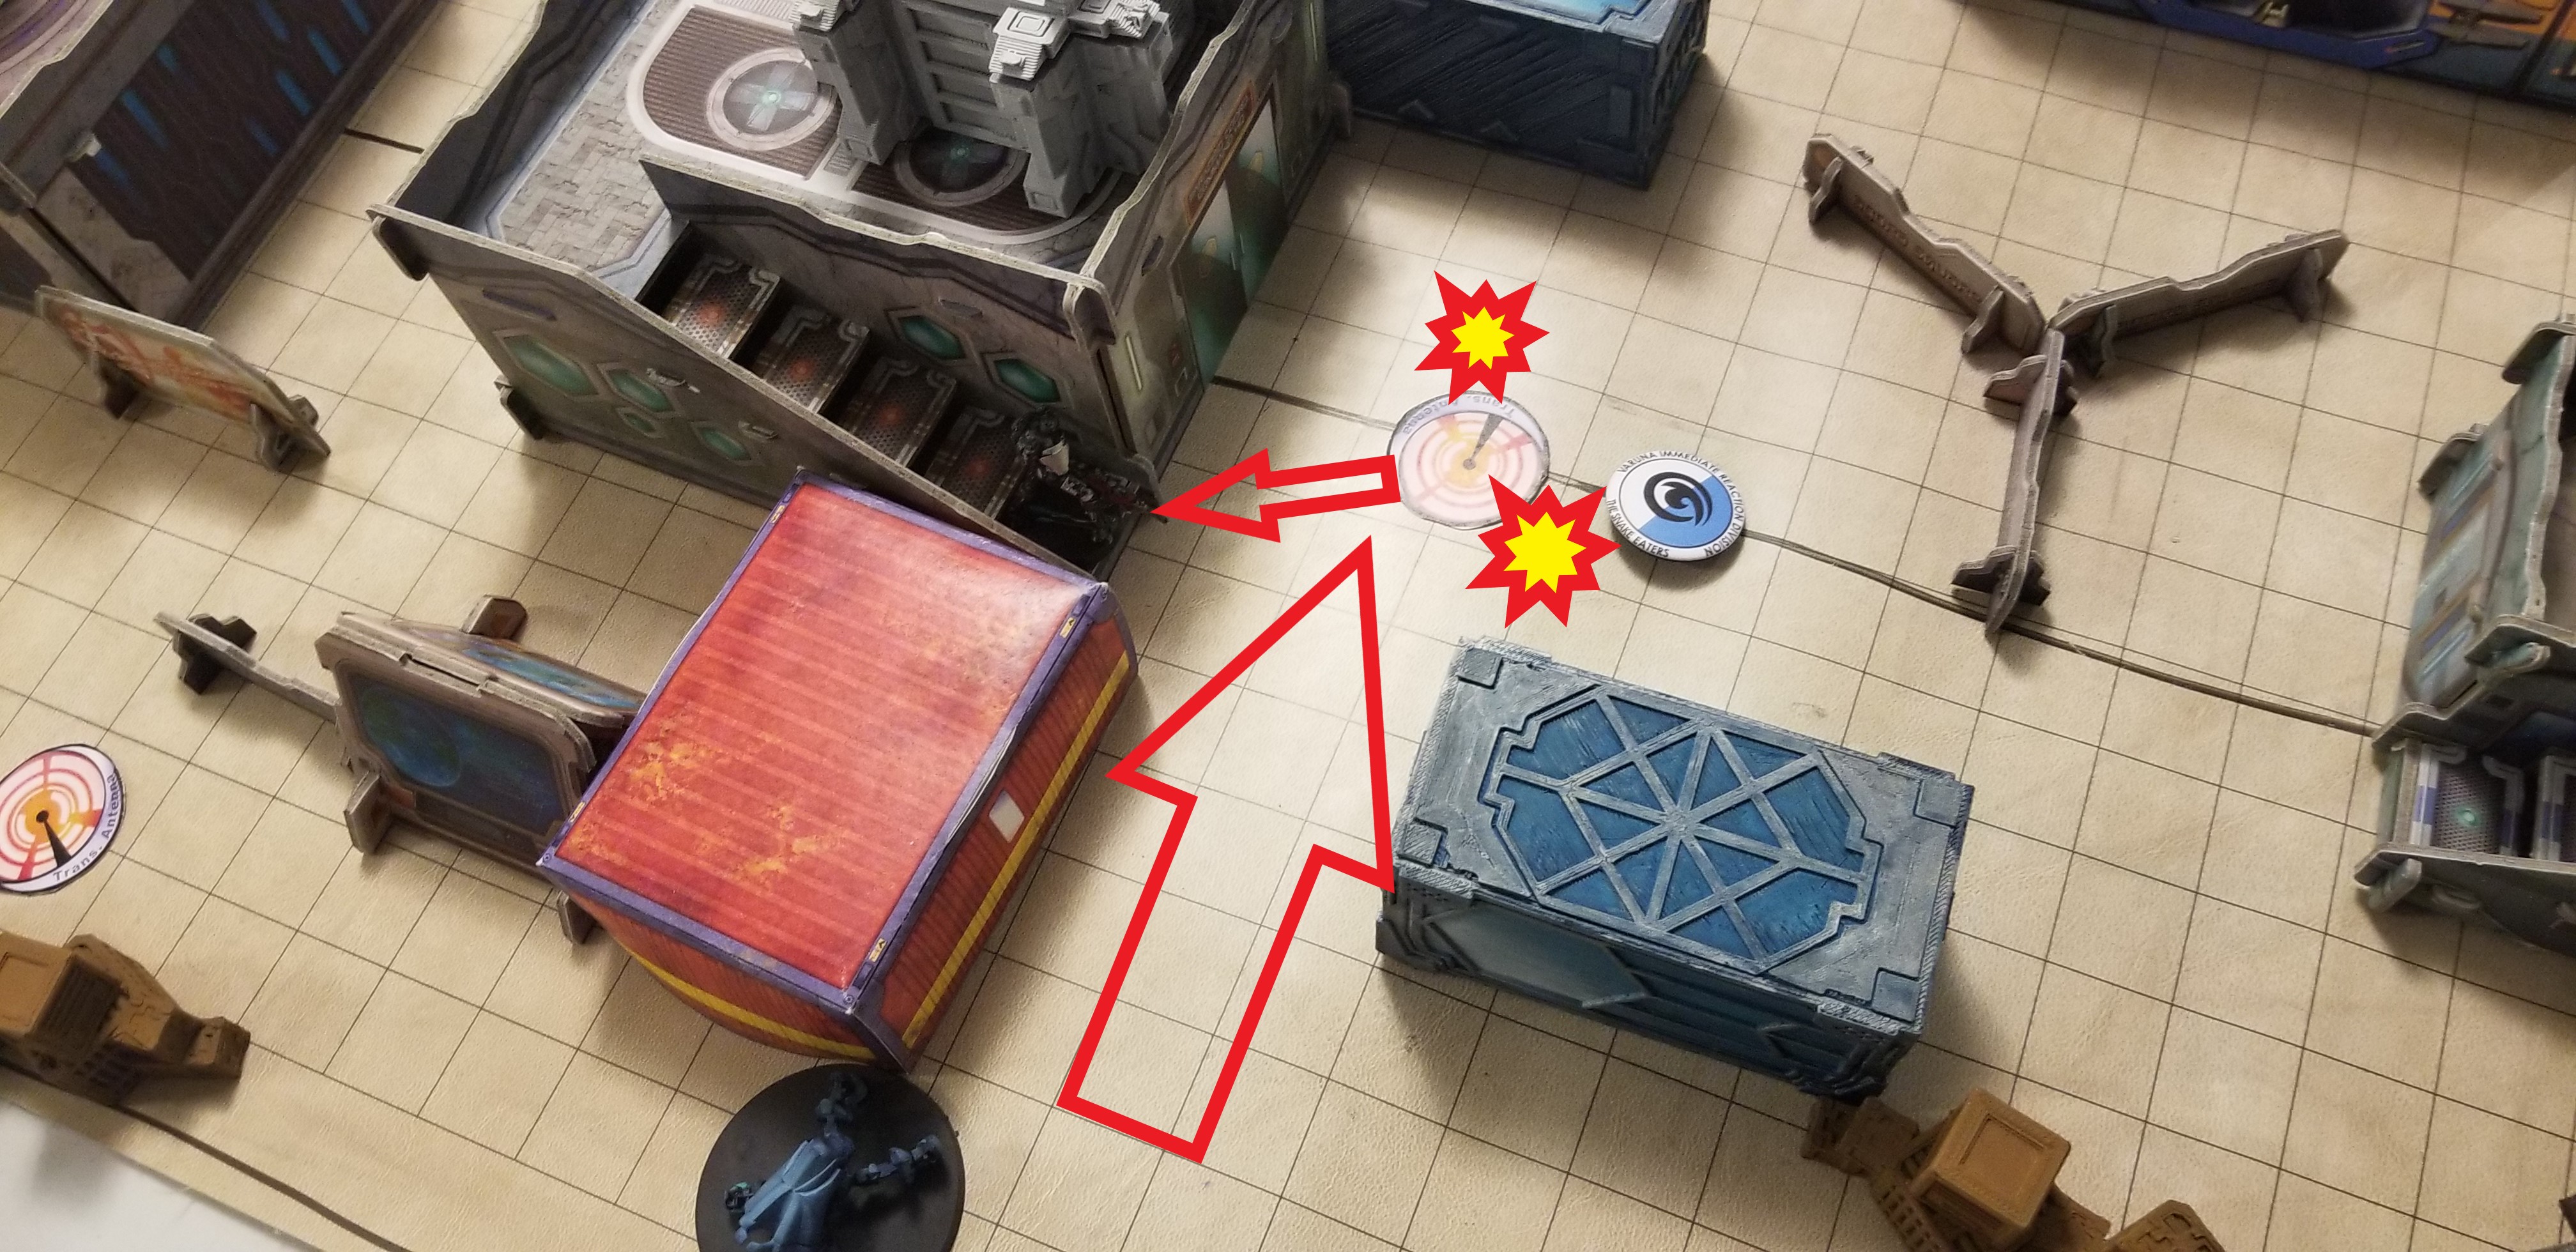 Patsy advances to the next Antenna on the PanOceanian right flank. After claiming it with her Forward Observer skill, she tries to destroy it with two D-Charges. The Antenna however passes the majority of its saves, only suffering two damage. Out of options, Patsy moves into cover.
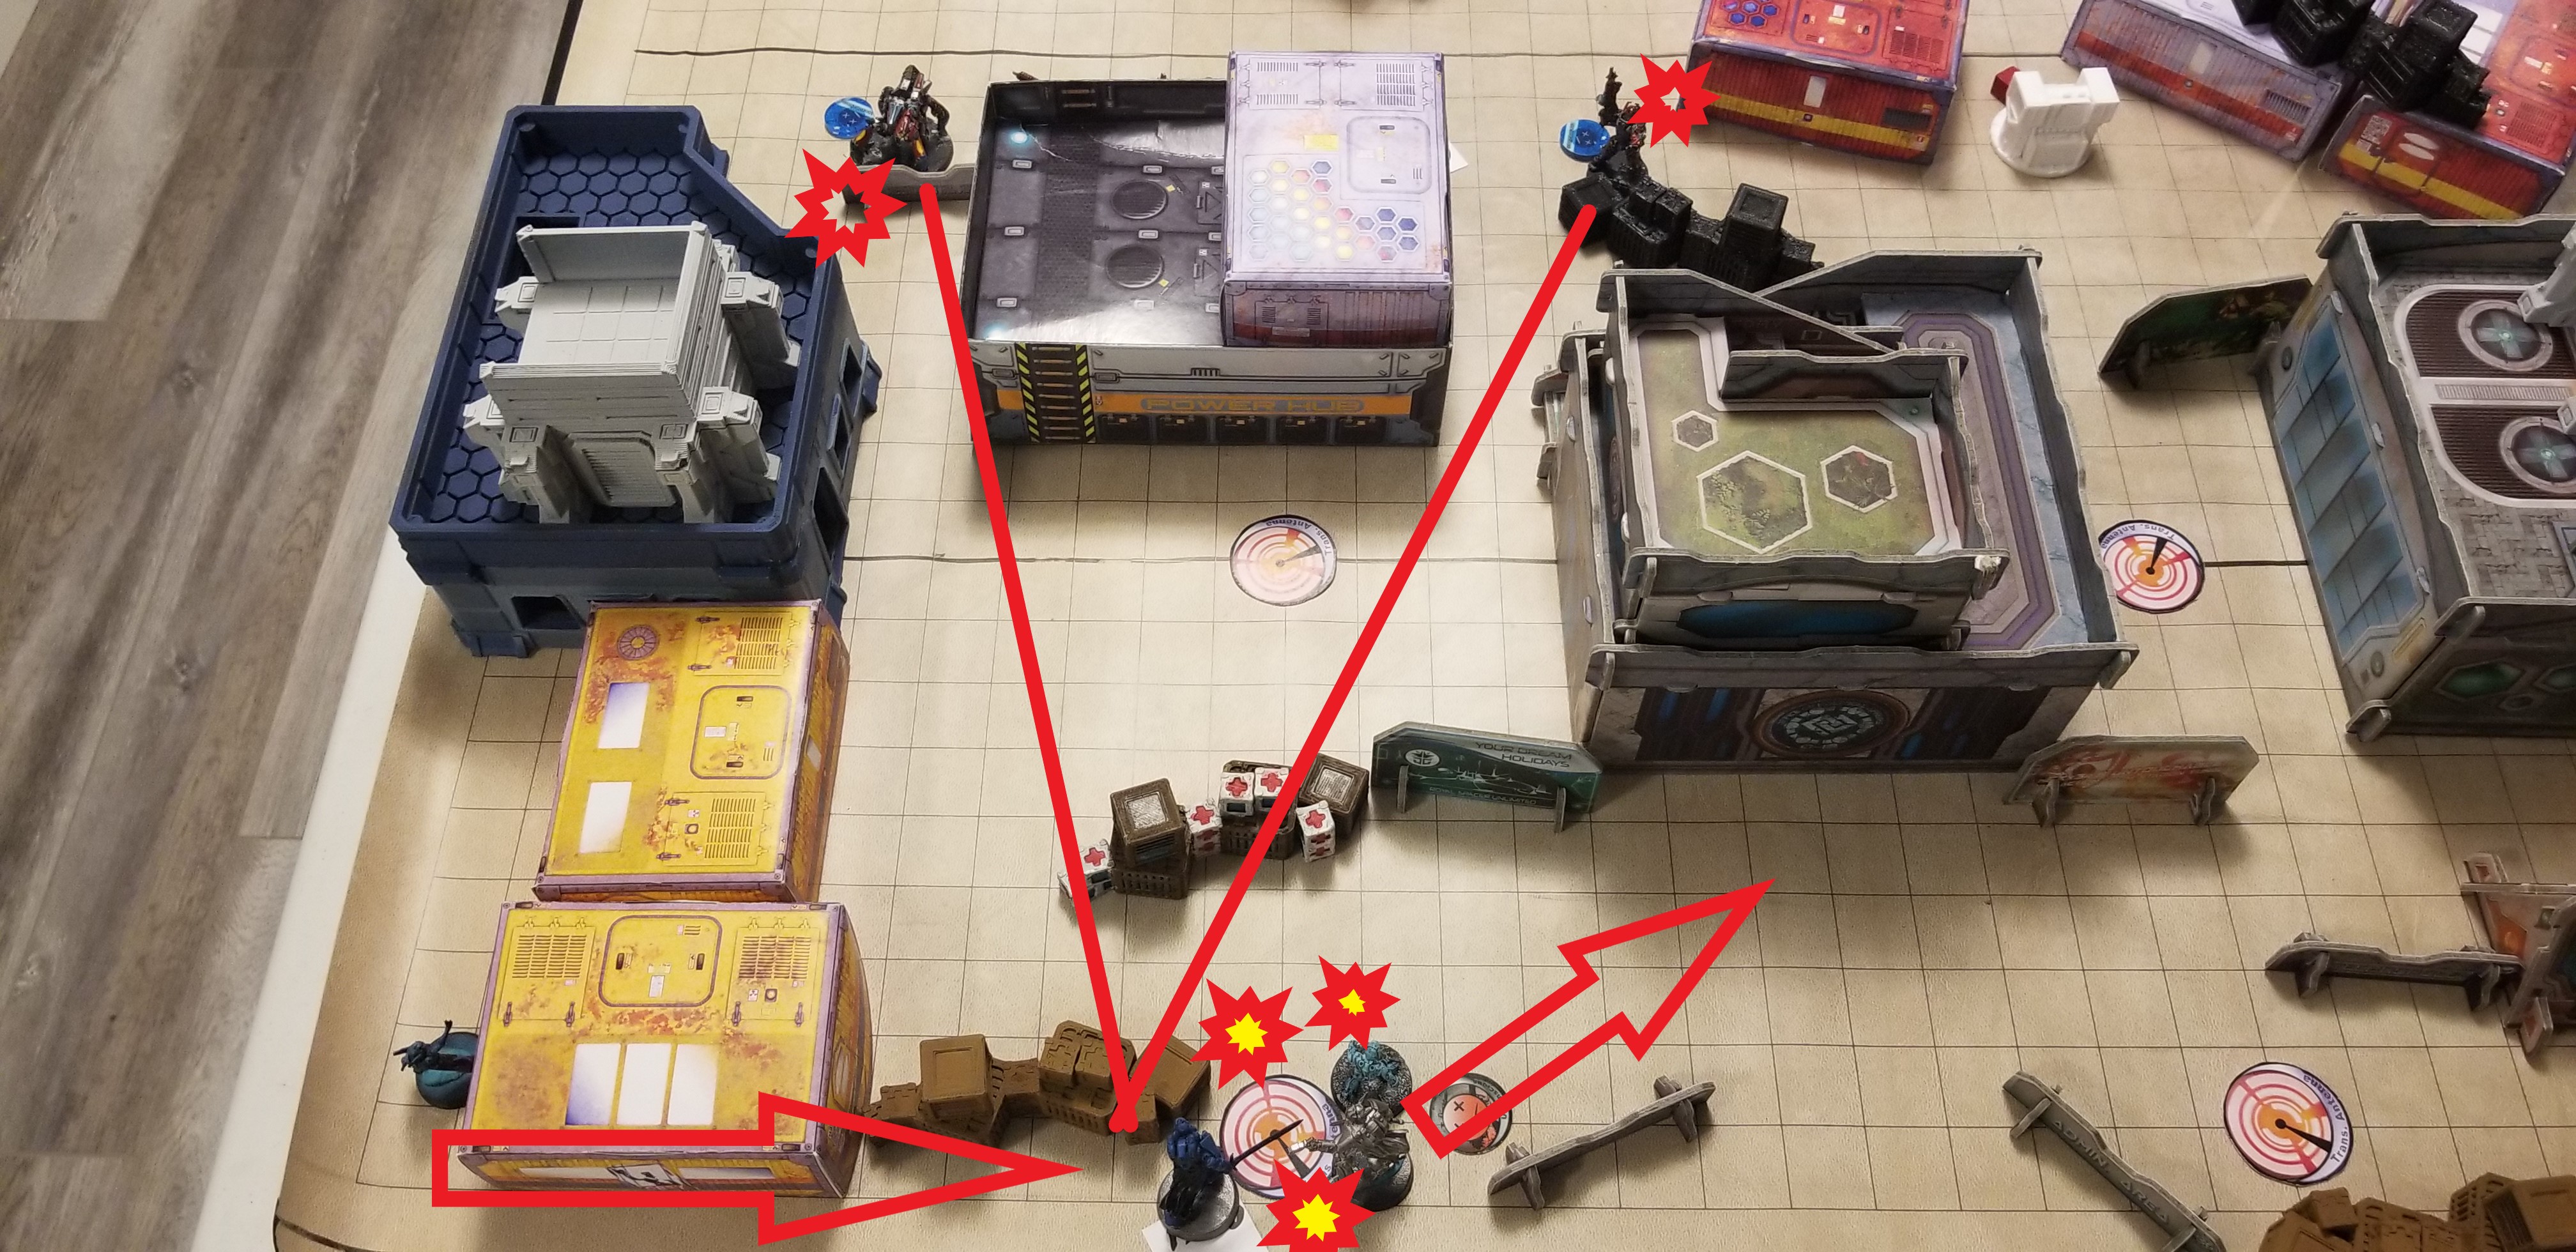 Concurrently, Joan moves from the HVT and engages both an E-Drone and a Rodok armed with a Boarding Shotgun. Making quick work of them with her Spitfire, she destroys the Antenna using her Explosive Close Combat Weapon, before moving forward into total cover.
COMBINED ARMY: BOTTOM OF TURN 2
The EI forces begin their turn by activating their Unidron link, and firing missiles at the towers which they had previously captured on turn 1. With one tower destroyed from missile fire, the EI forces decide upon a different course of action.
Descending the catacomb networks of the Gallery Maze, Ko Dali descends upon a EI claimed terminal. Over three orders, she plants 3 D-charges on it, but is only able to damage the terminal twice. A nearby Umbra Legate joins the fray! With the assistance of Ko Dali, the Umbra is able to take two massive swings at the terminal, scoring two critical hits! However, due to the treacherous terrain of the maze, the Umbra's success also spelt his doom.
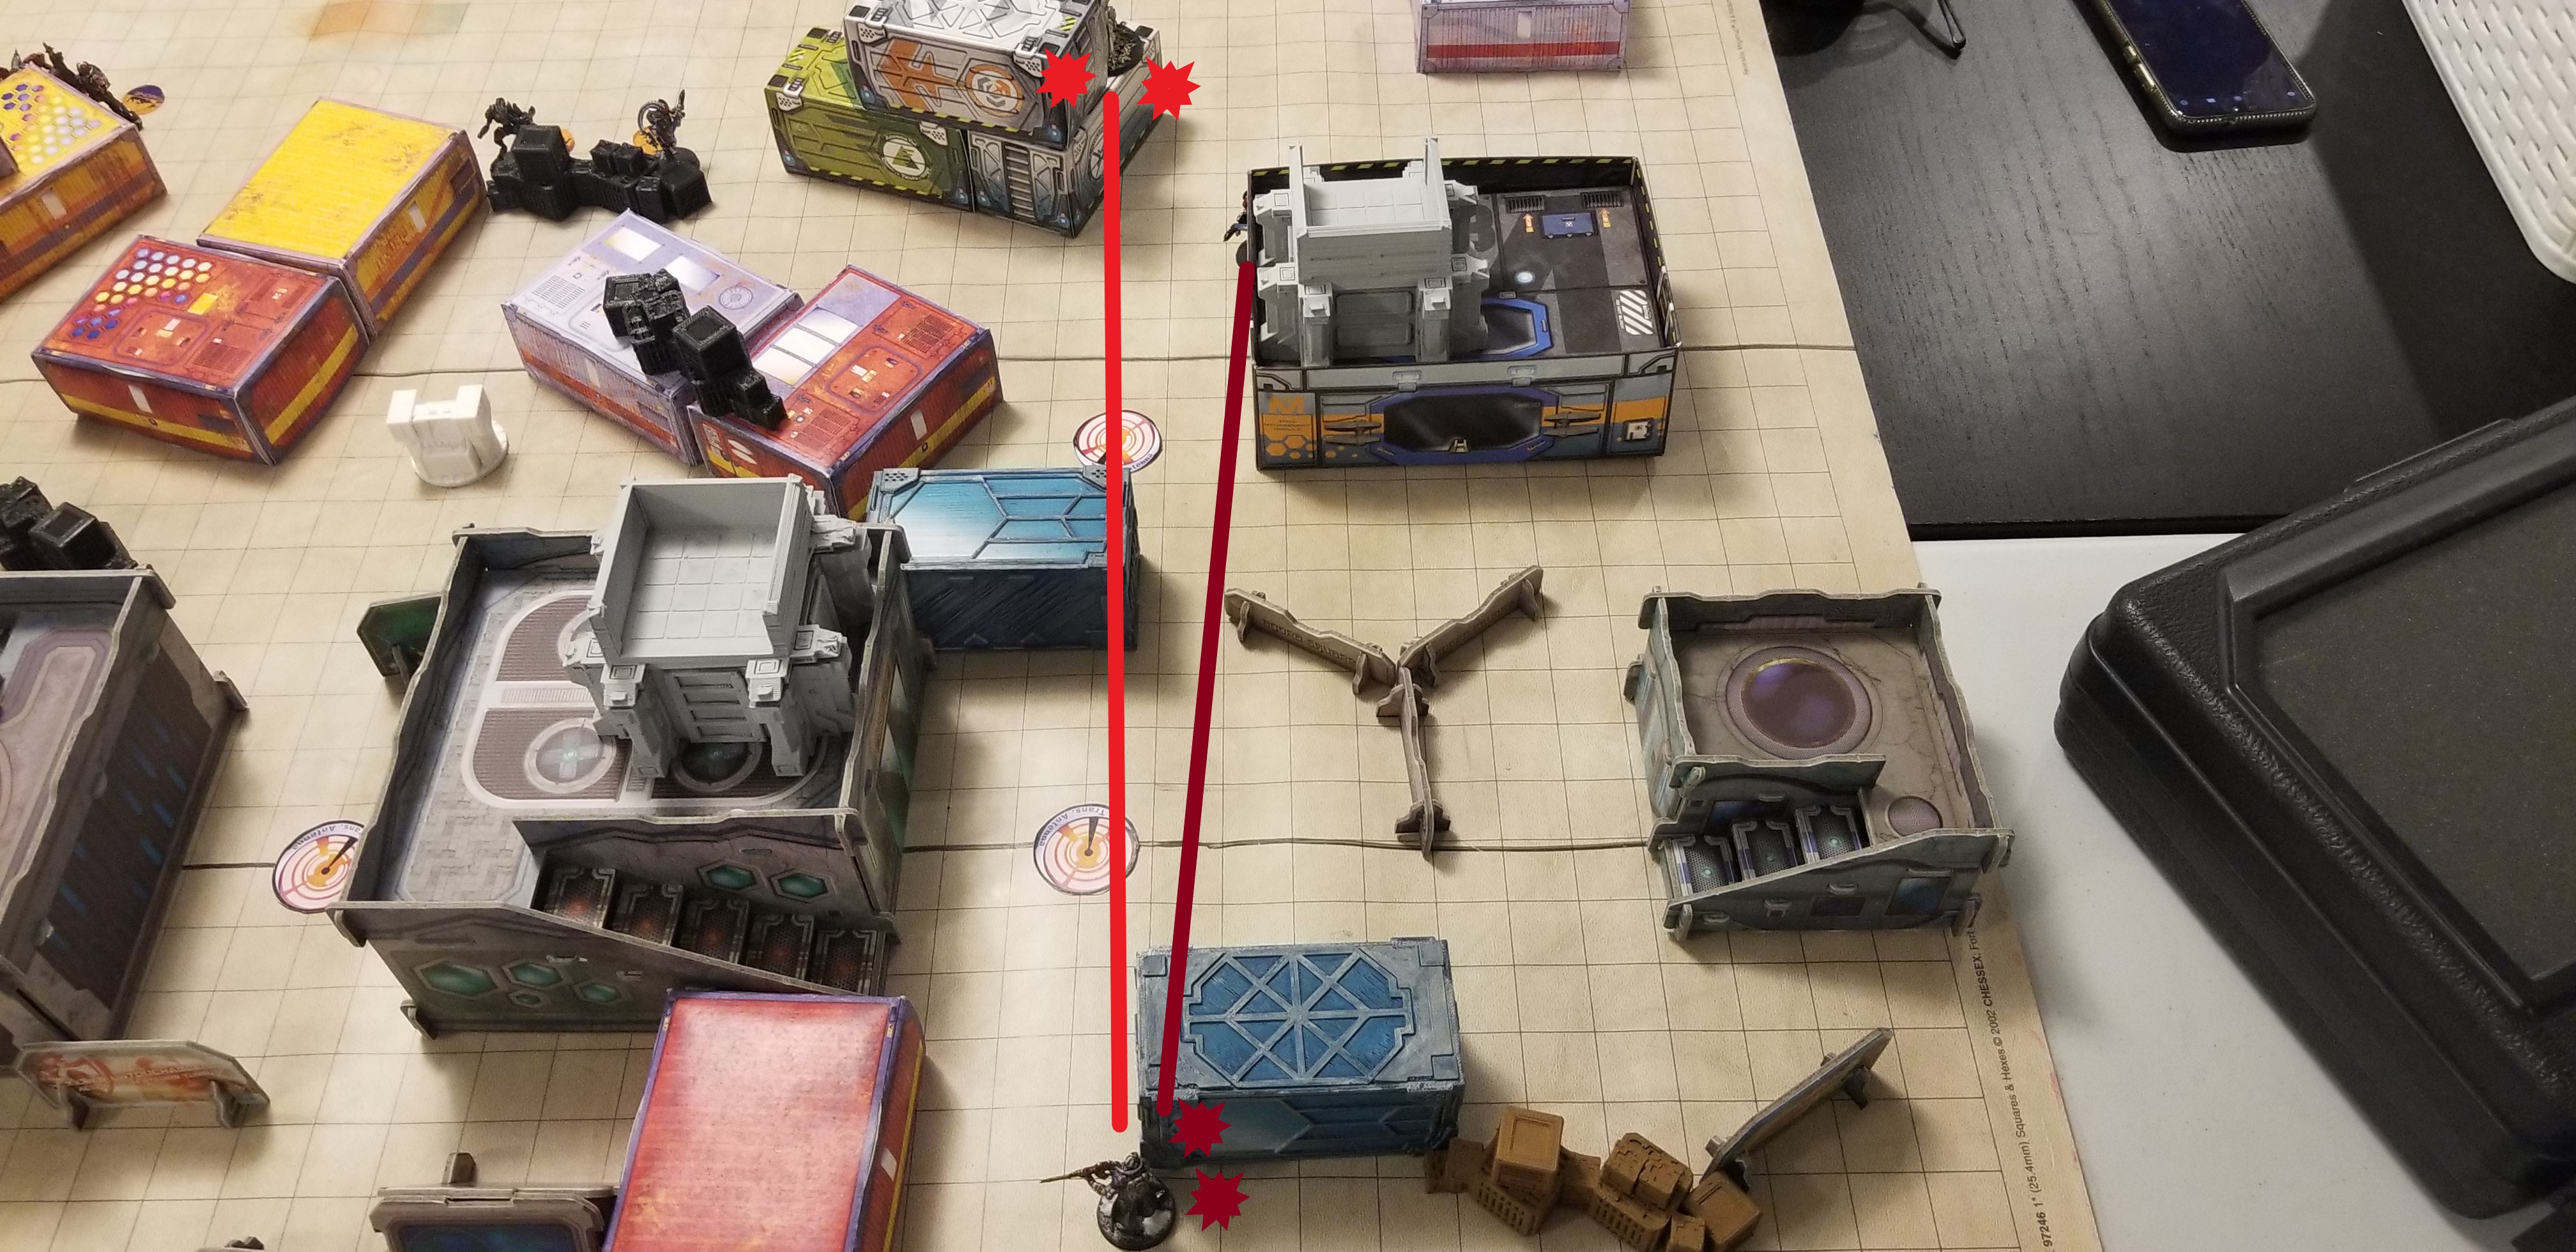
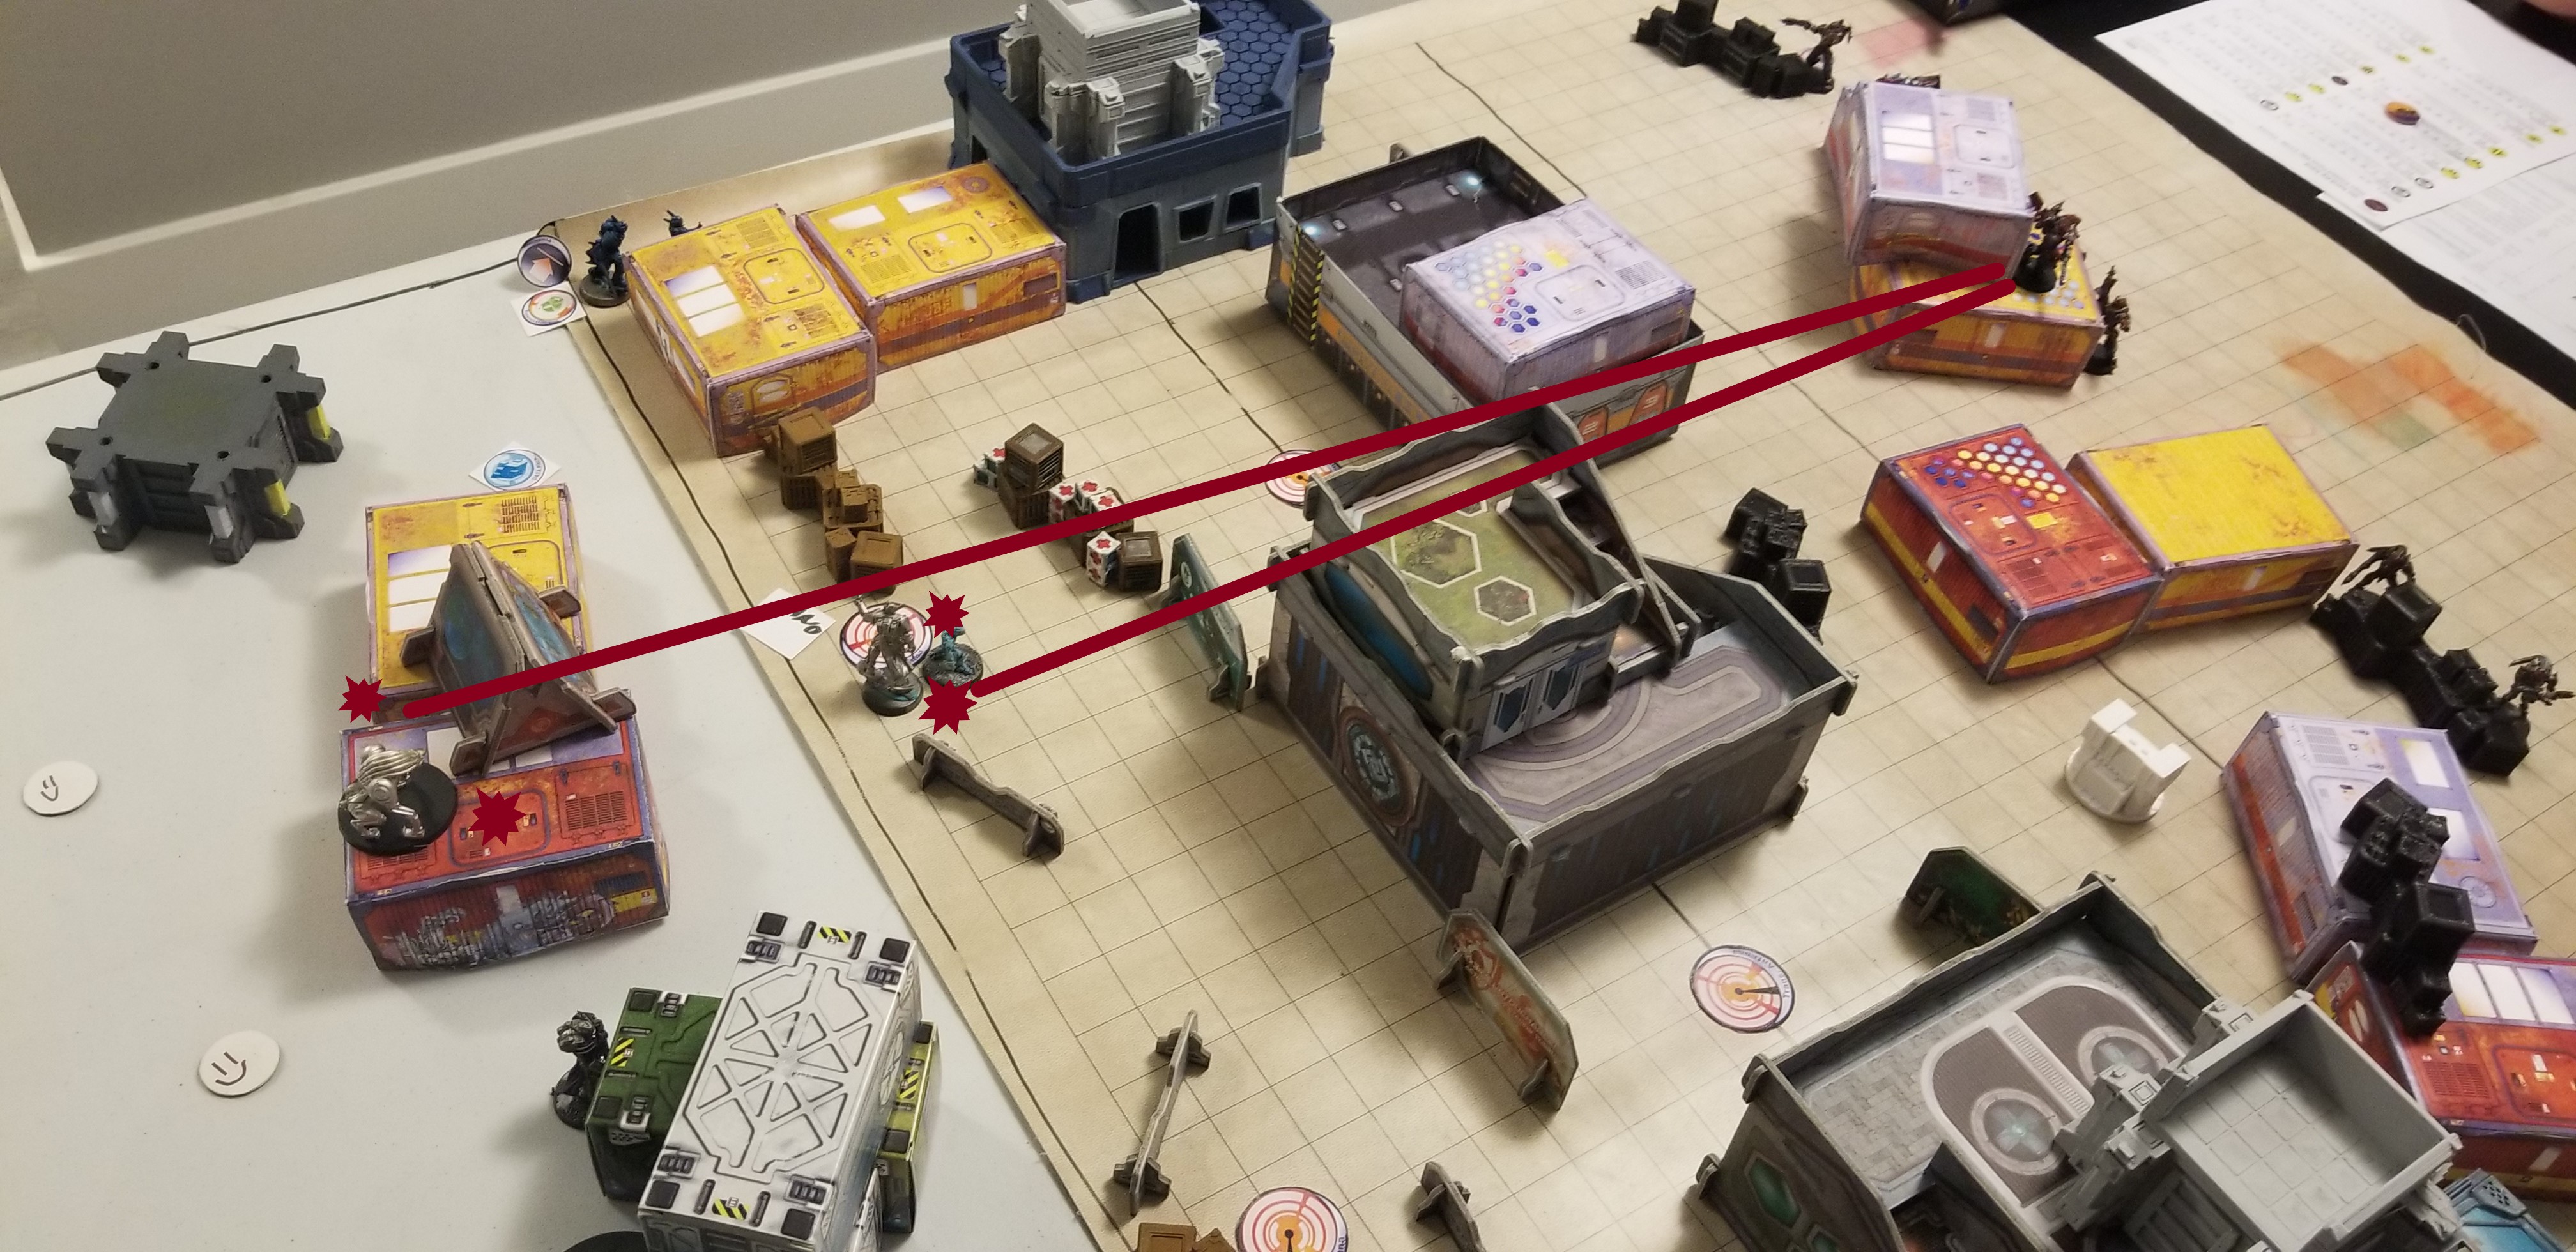
Finally, the Combined Army decides they must do something about the PanOceanian HVT. Moving from cover, the Rodok Data-Tracker and Heavy Machine Gunner duck through and over cover. The Data Tracker super jumps atop a building, before advancing and obliterating the PanOceanian HVT in close range with two light shotguns! Meanwhile, the Rodok Heavy Machine Gunner moves into a position of overwatch on the PanOceanian left flank!
 Ko Dali and an Umbra Legate take down an antenna tower! It takes 3 D-Charges, and 2 hits from the Umbra's Double Action Close Combat Weapon, but the tower falls! Unfortunately for the Umbra, he does as well.
 (Because no pictures were taken of it during the game) The path the Data Tracker Rodok took, before gunning down the PanOceanian HVT!
PANOCEANIA: TOP OF TURN 3
"Our HVT has been killed!" shouted the Lieutenant over the radio.
"Joan, I need you to return the favor, kill their HVT. Patsy, I need you to designate as many towers as you can, we can still win this!
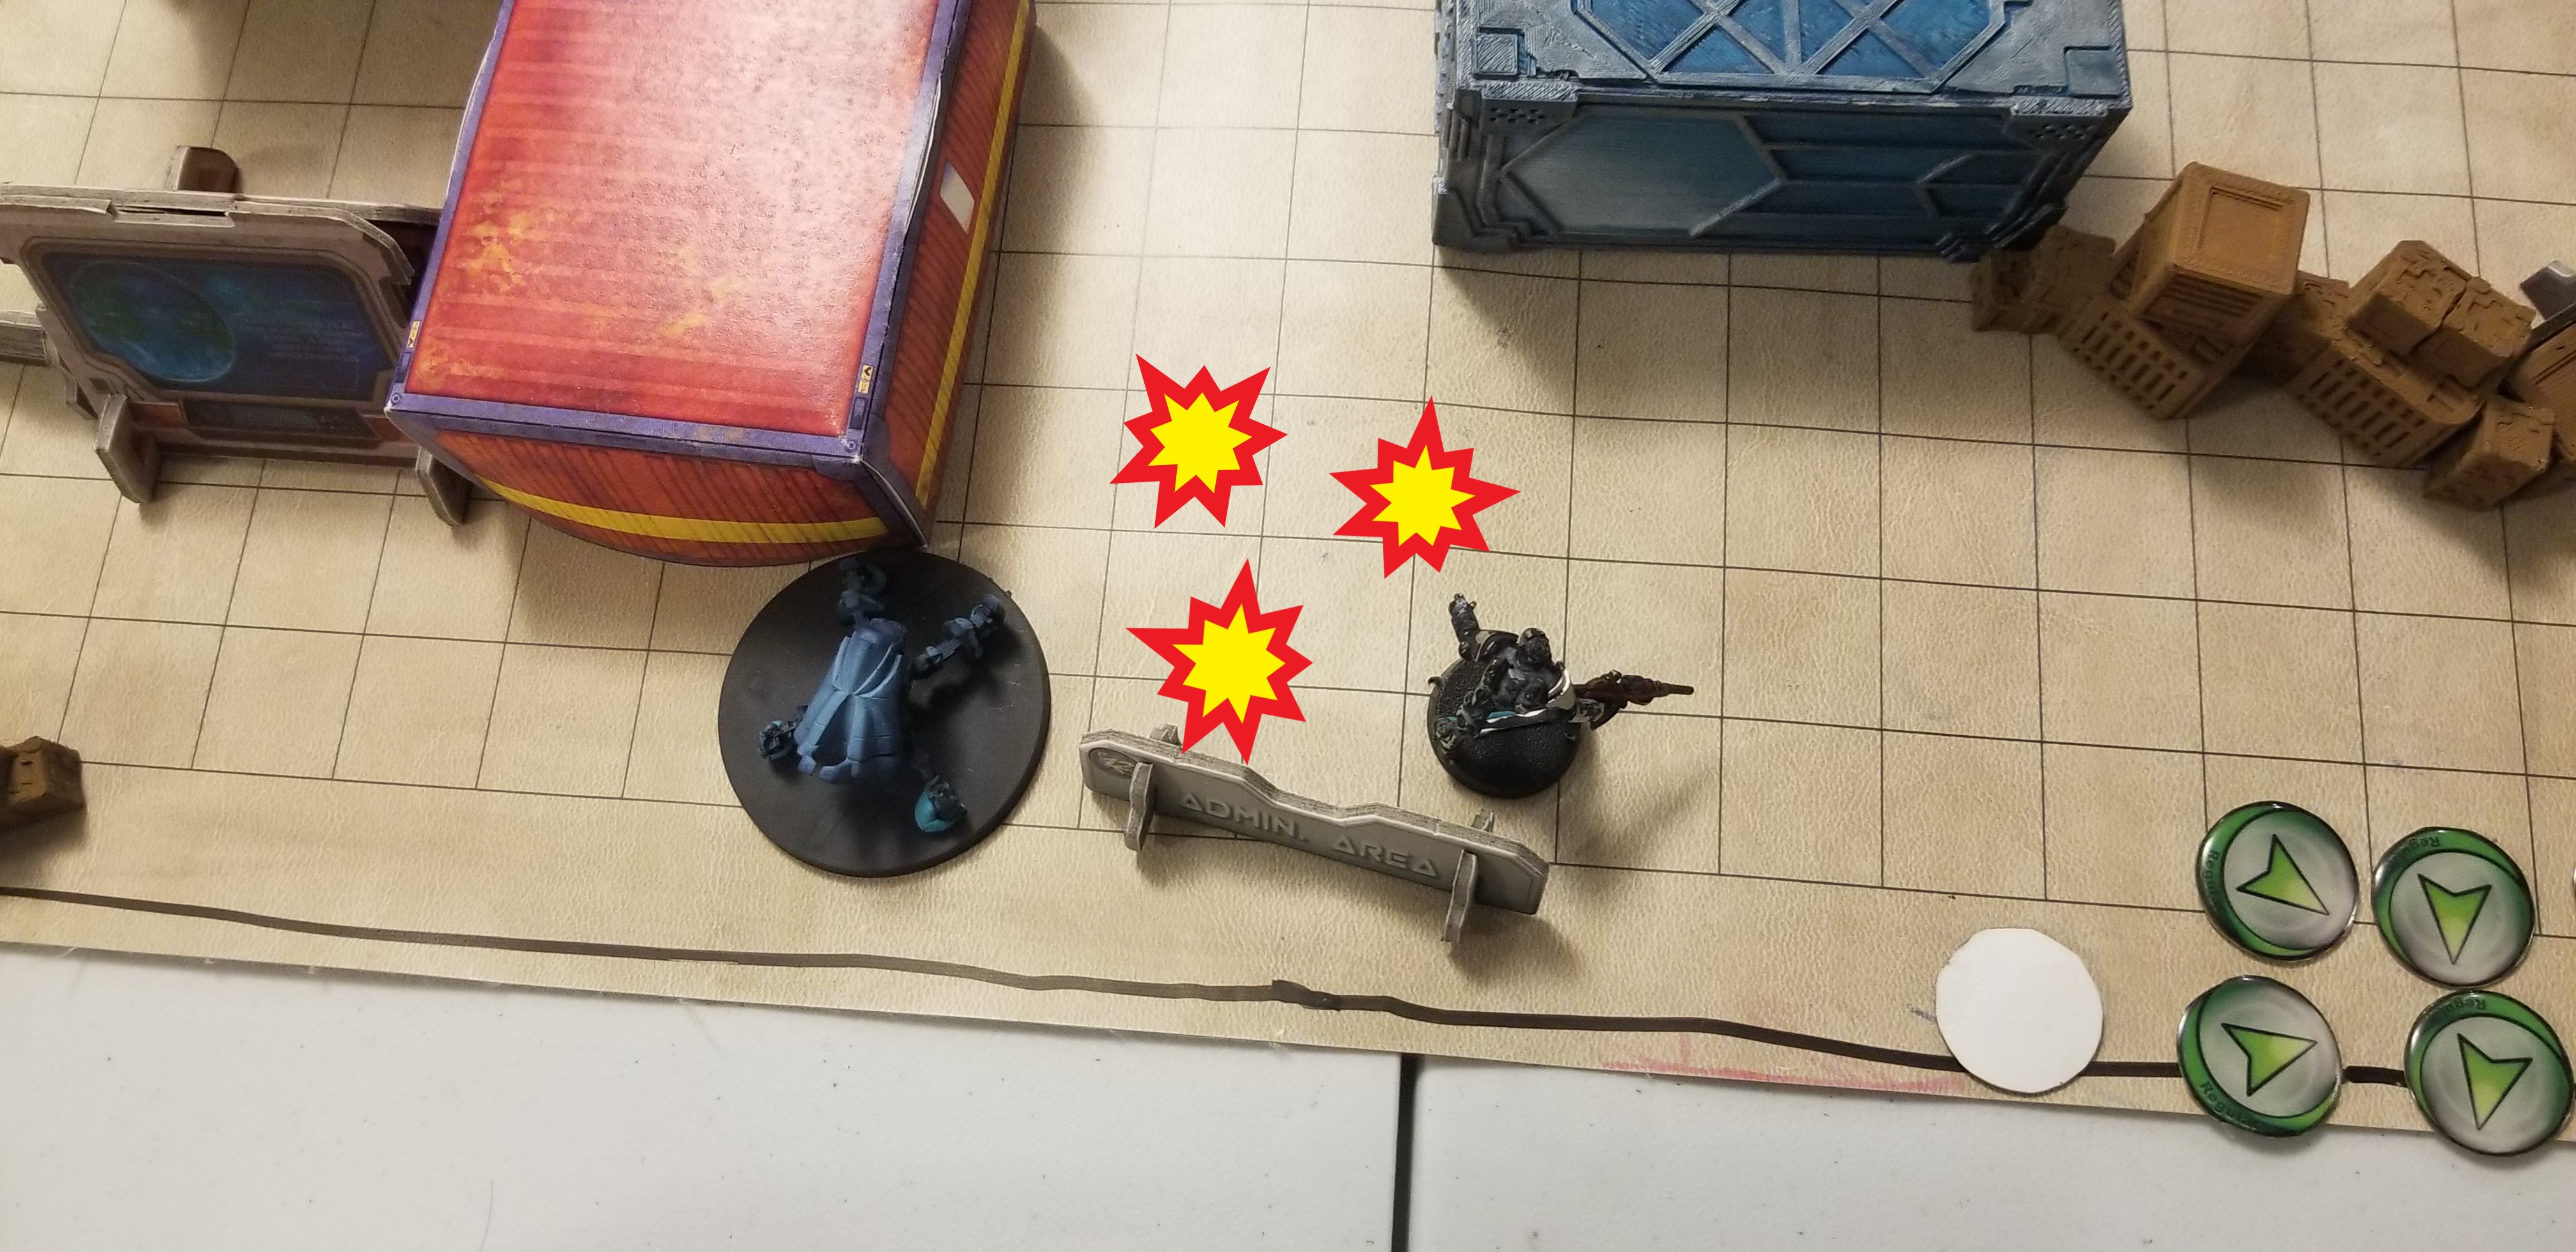
Joan, lost in a frenzy, begins to charge into the enemy lines. Though the Rodok machine gunner tries his best to stop her, he easily falls to her Spitfire. Carrying on, Joan rushes into the back of the enemy lines, descends upon the enemy HVT. Using her powerful martial arts skills, coupled with her explosive close combat weapon, the HVT falls in a single swing!
Patsy, meanwhile advances to the center of the building, and attempts to forward observe two different towers, while receiving oncoming fire! She succeeds at marking one tower for the PanOceanian forces, the center middle one, but fails to mark the one closest to Joan. In a fury of return fire, Patsy goes unconscious.
With Joan unable to make work of the tower closest to her, the Monstrucker moves forward from cover and claims the objective closest to him. Unfortunately, despite his best efforts, his D-charges weren't enough to take down the objective.
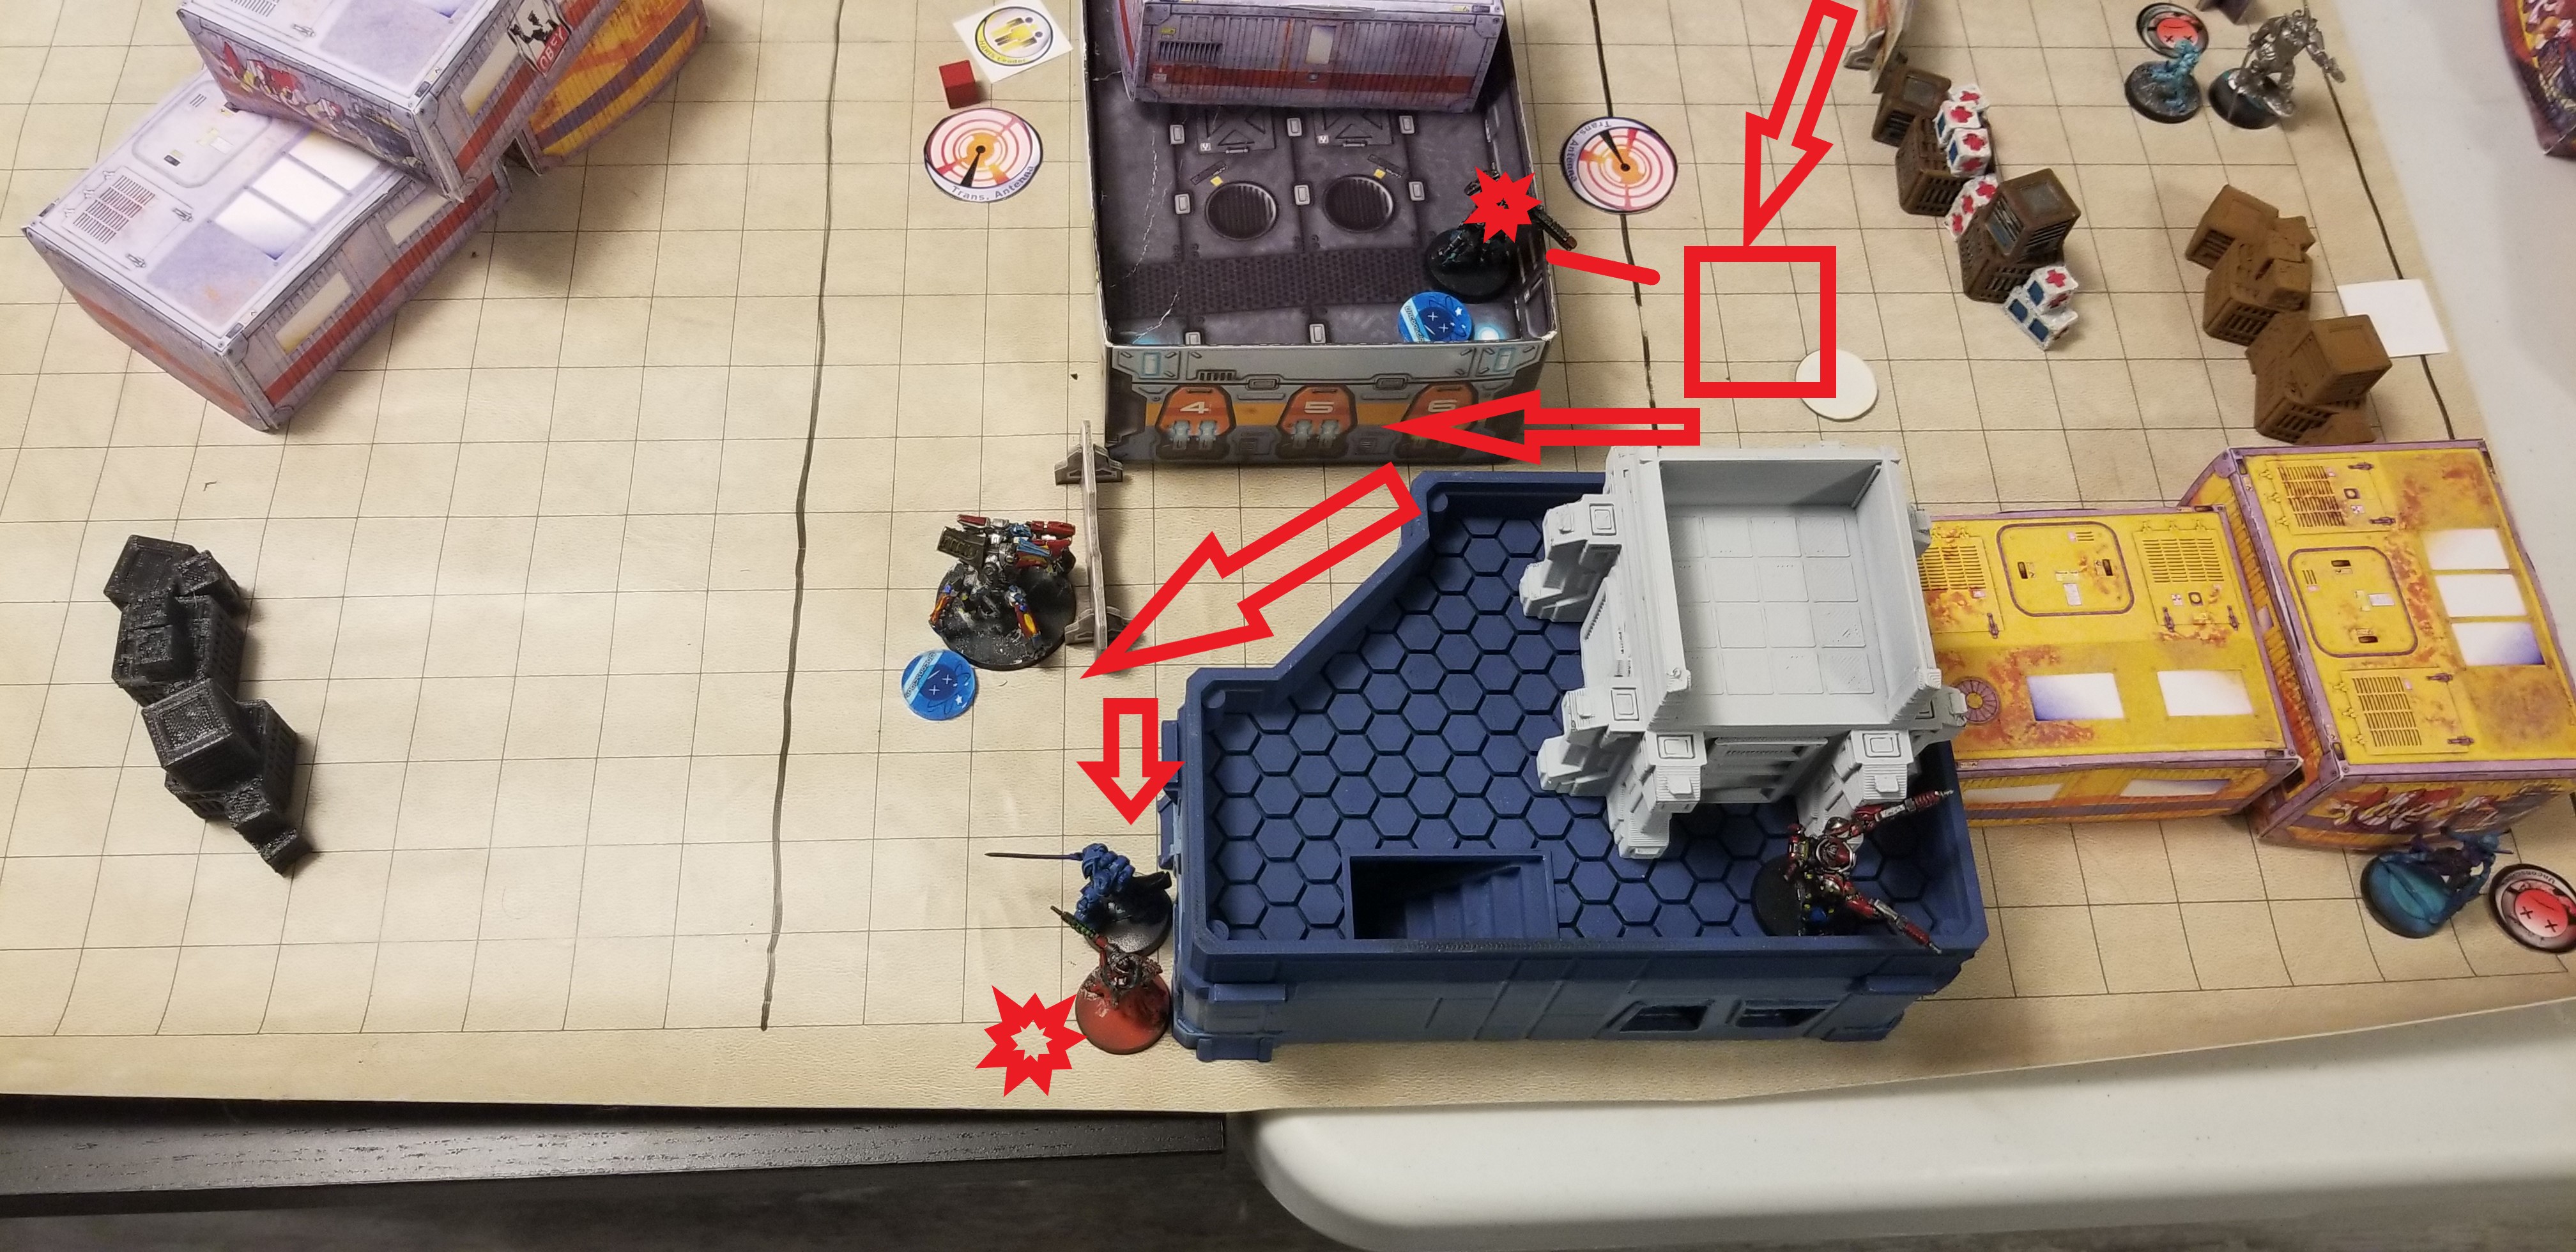 Joan advances towards the enemy HVT, wounding a Rodok along the way. With a single swing of her EXP CCW, the enemy HVT falls. Also pictured: The enemy Data-tracker atop the Blue Building, having shot the PanO HVT at the bottom of turn 2.
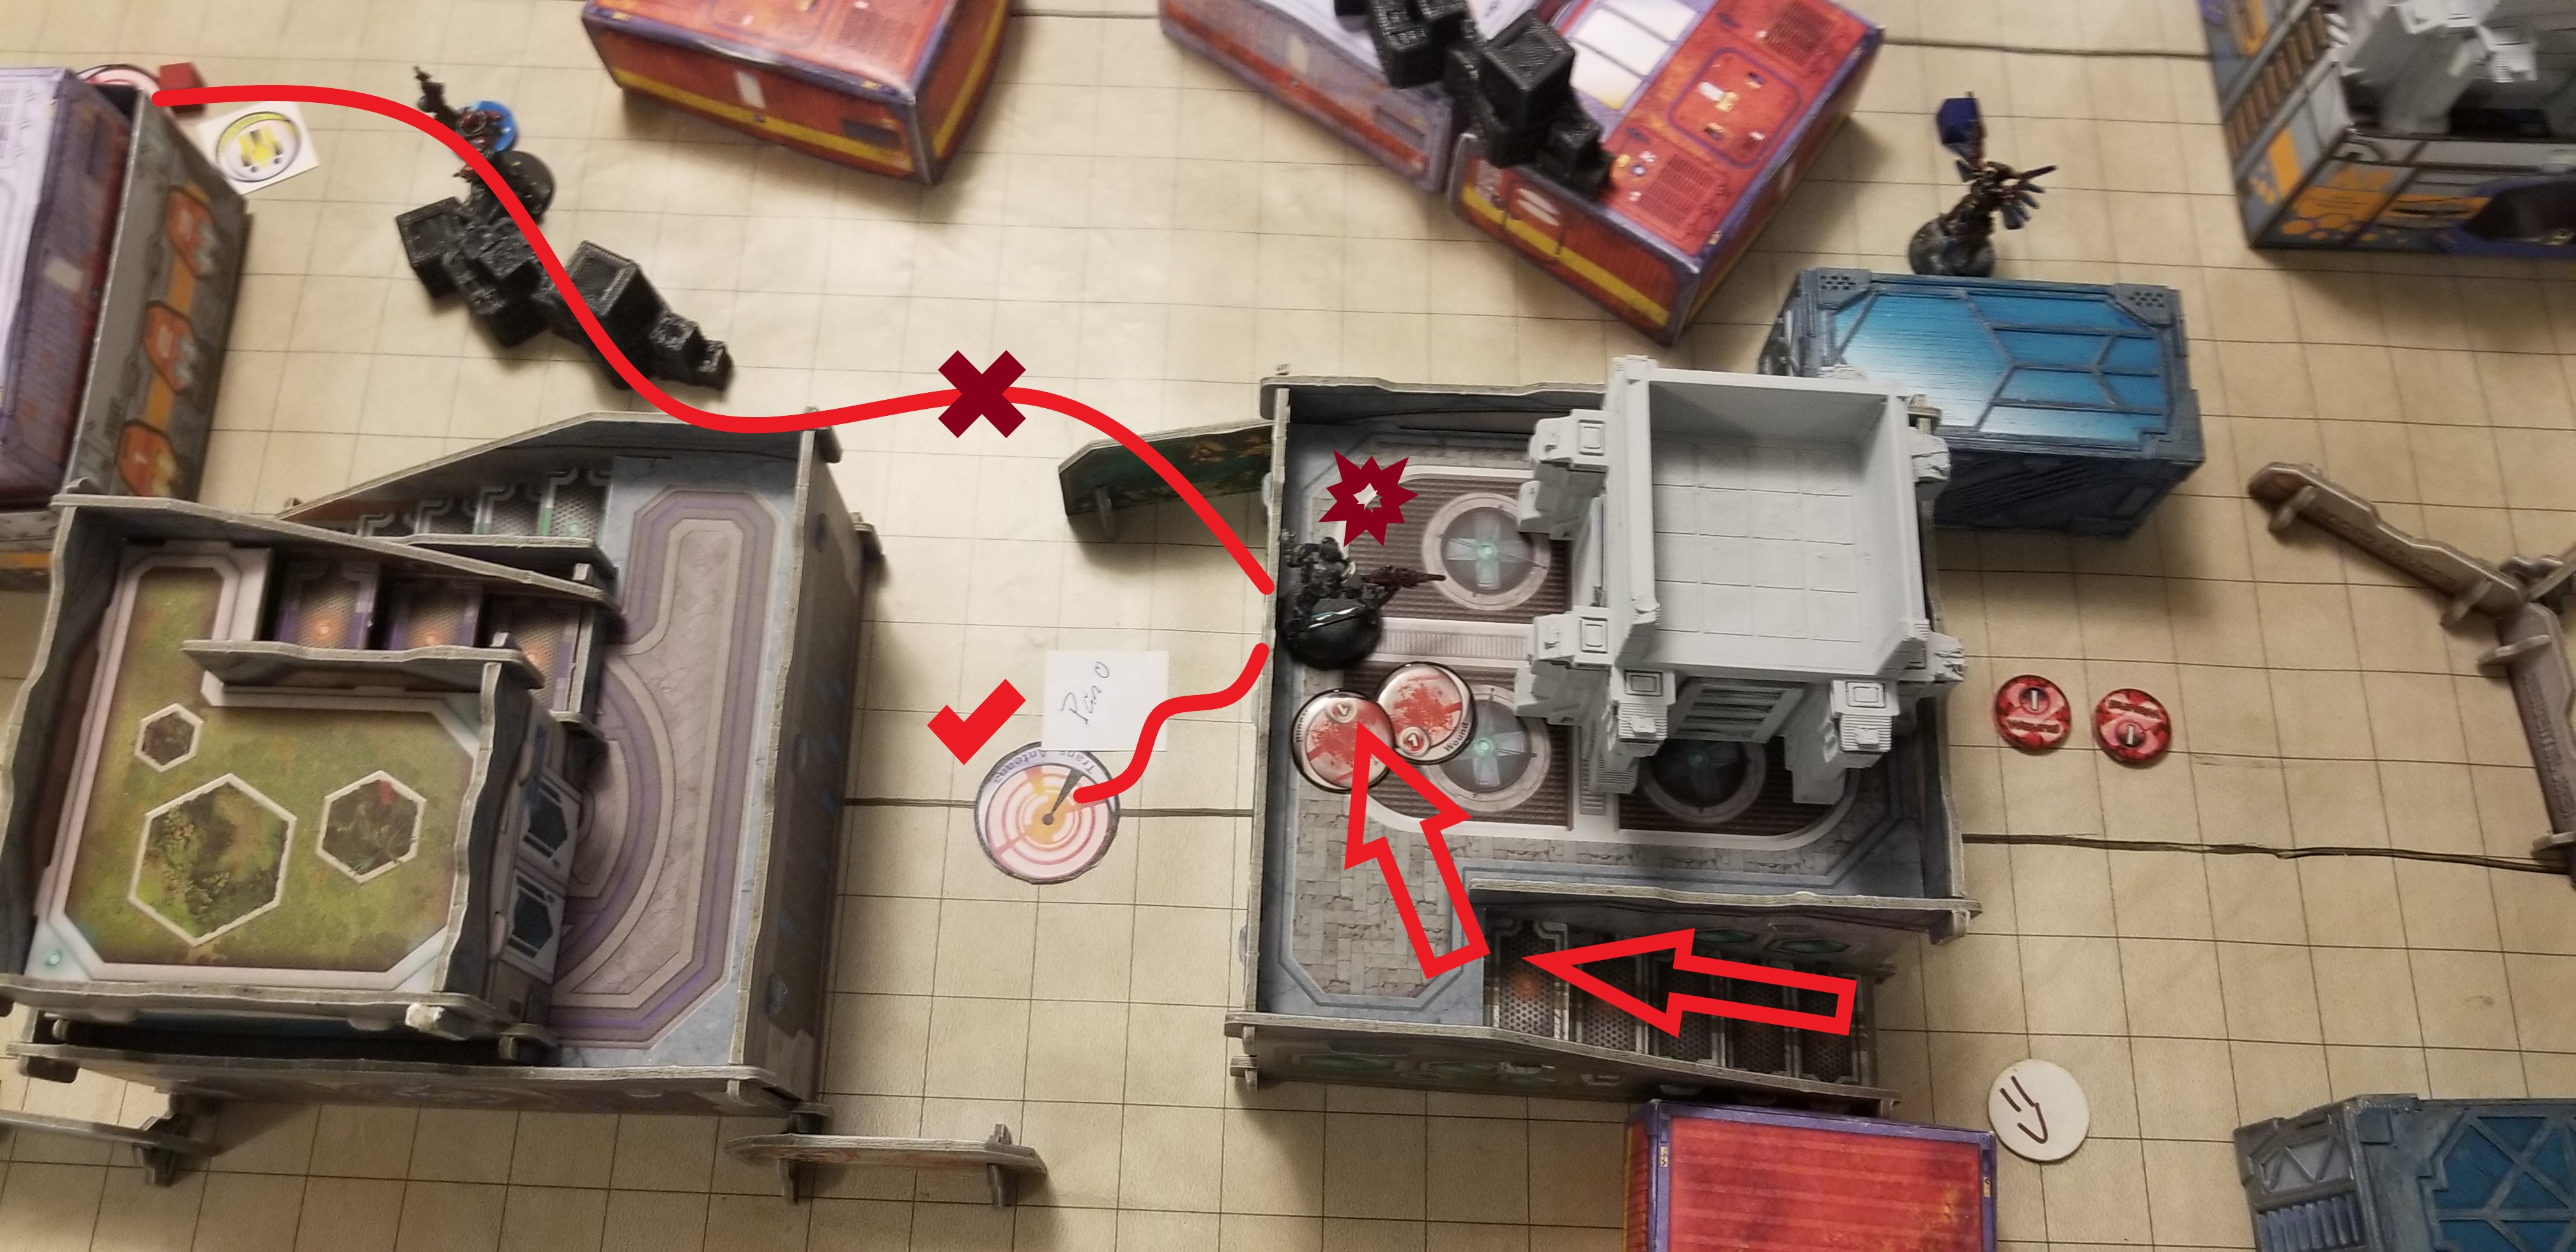 Patsy moves from cover, and attempts to forward observe two antenna! While she is able to mark one for PanOceanian forces, she fails at the other, and is rendered unconscious in the return fire.
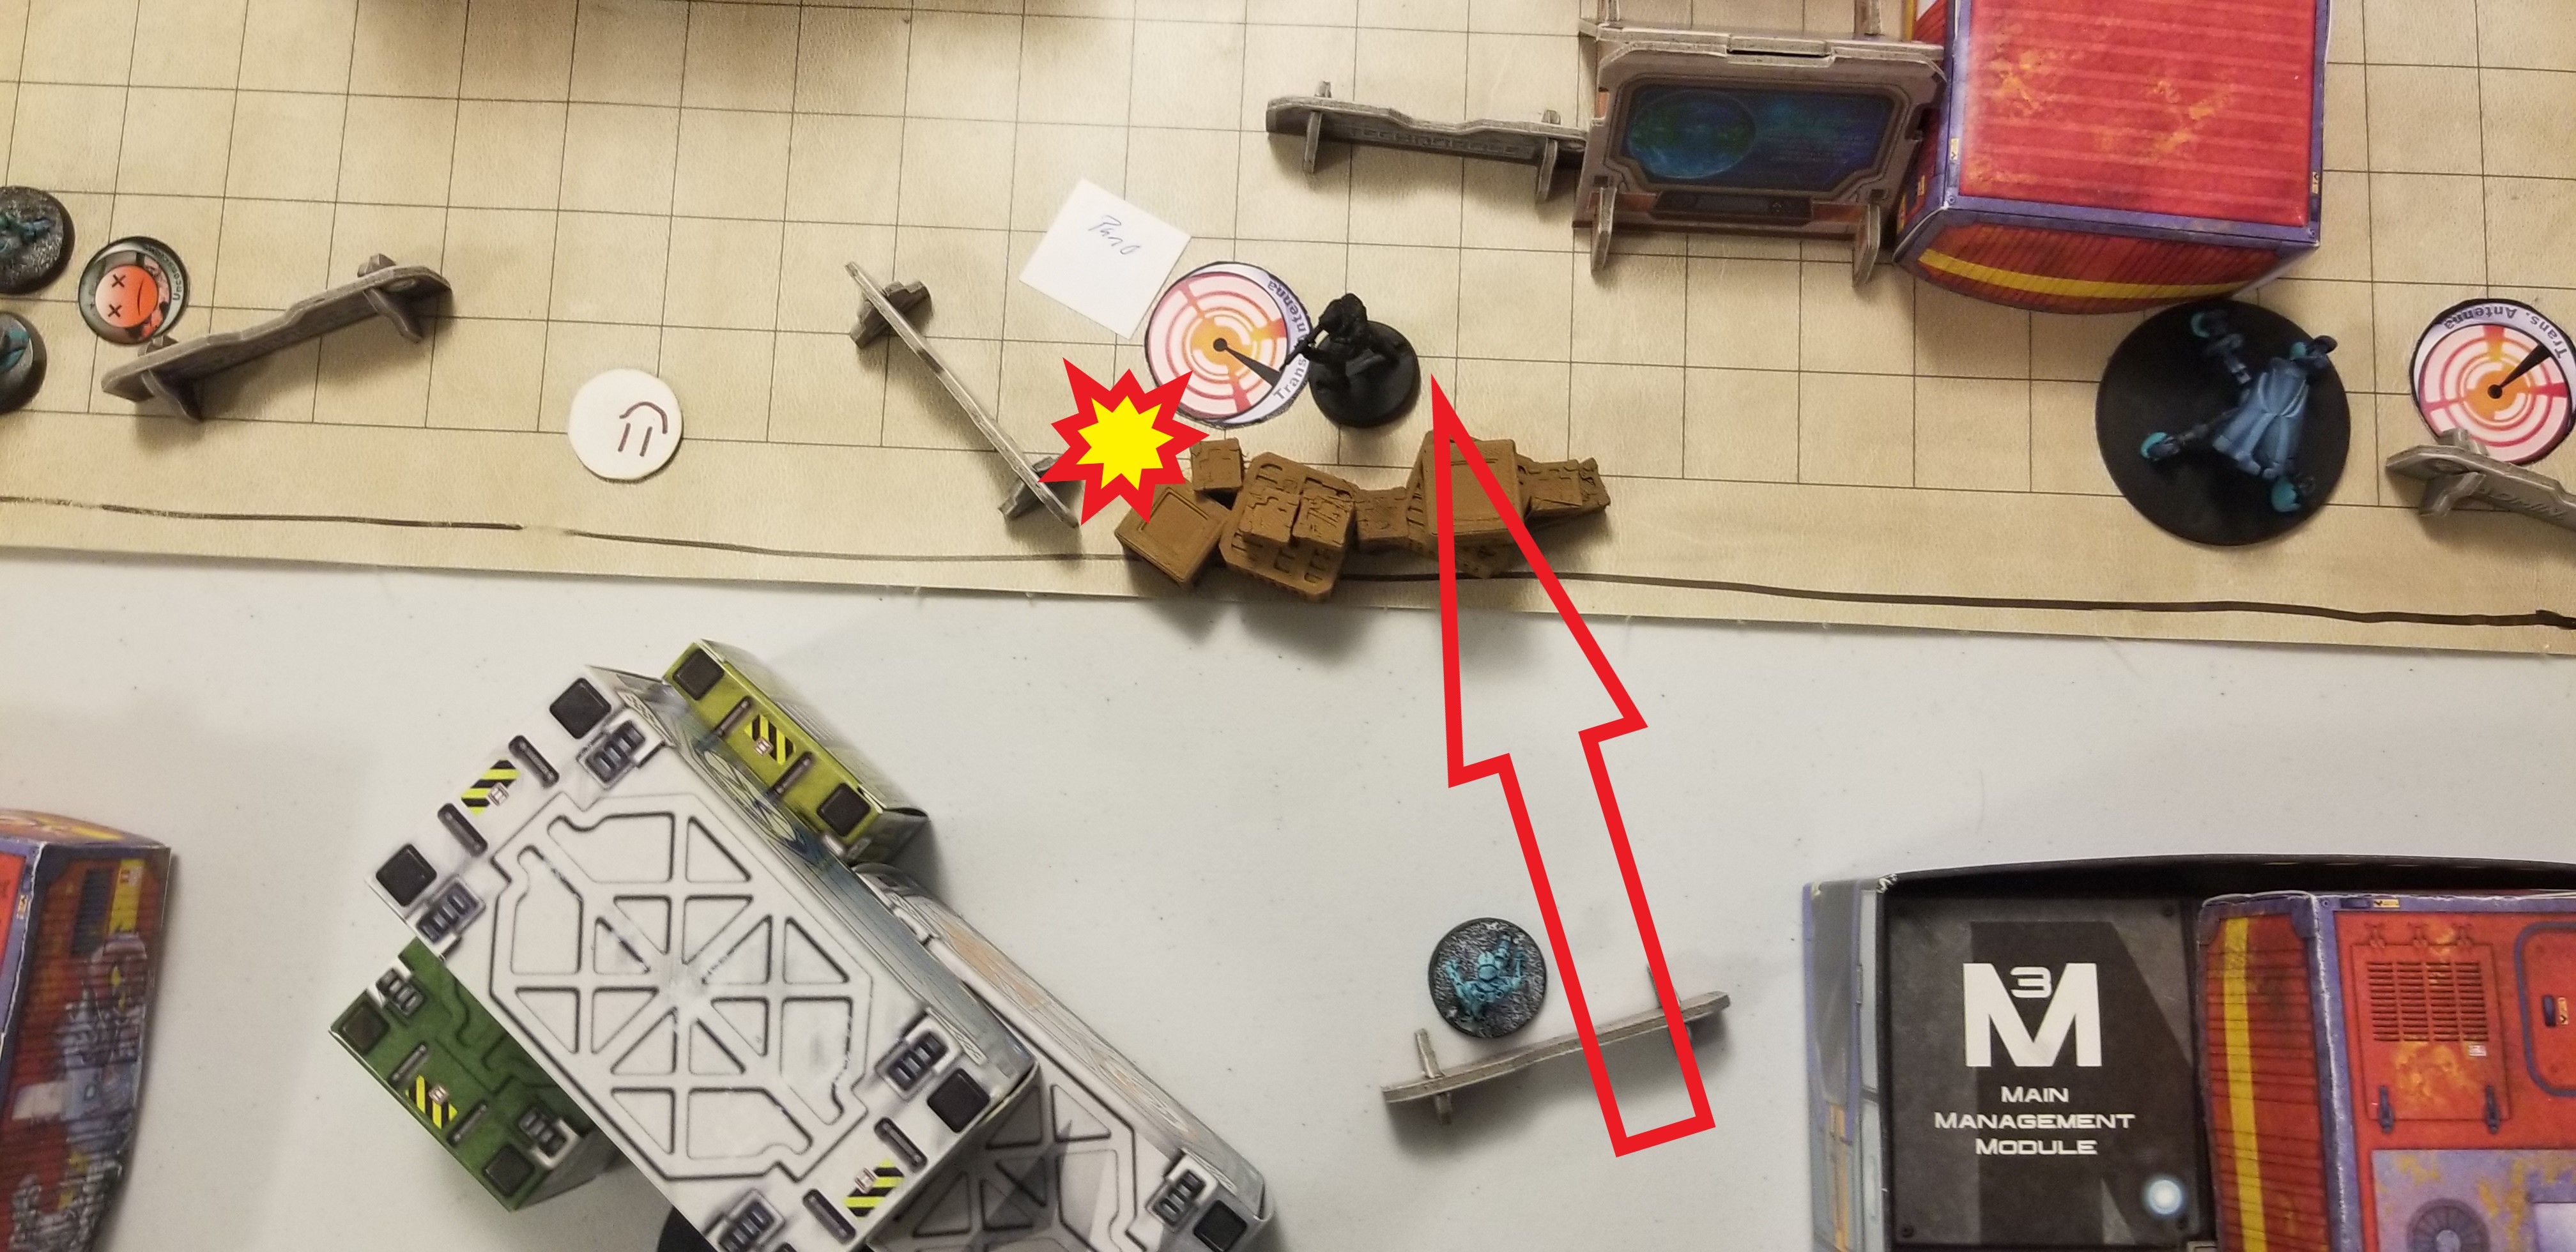 In a final move of desperation, the Monstrucker advances and claims an objective. Despite his best efforts, the D-charges are unable to destroy the tower.
COMBINED ARMY: BOTTOM OF TURN 3
The Combined Army moves its forces in two different directions, the Unidron Missile Launcher moves to the back, while a Unidron Forward Observer moves forward! After two missiles, the Unidron is able to destroy the tower closest to Joan, the back left tower (relative to PanOceanian deployment).
Meanwhile, the Forward Observer, with 3 orders left, is able to claim the center middle objective, robbing it from PanOceanian forces!
With that, the Combined Army scores a victory.
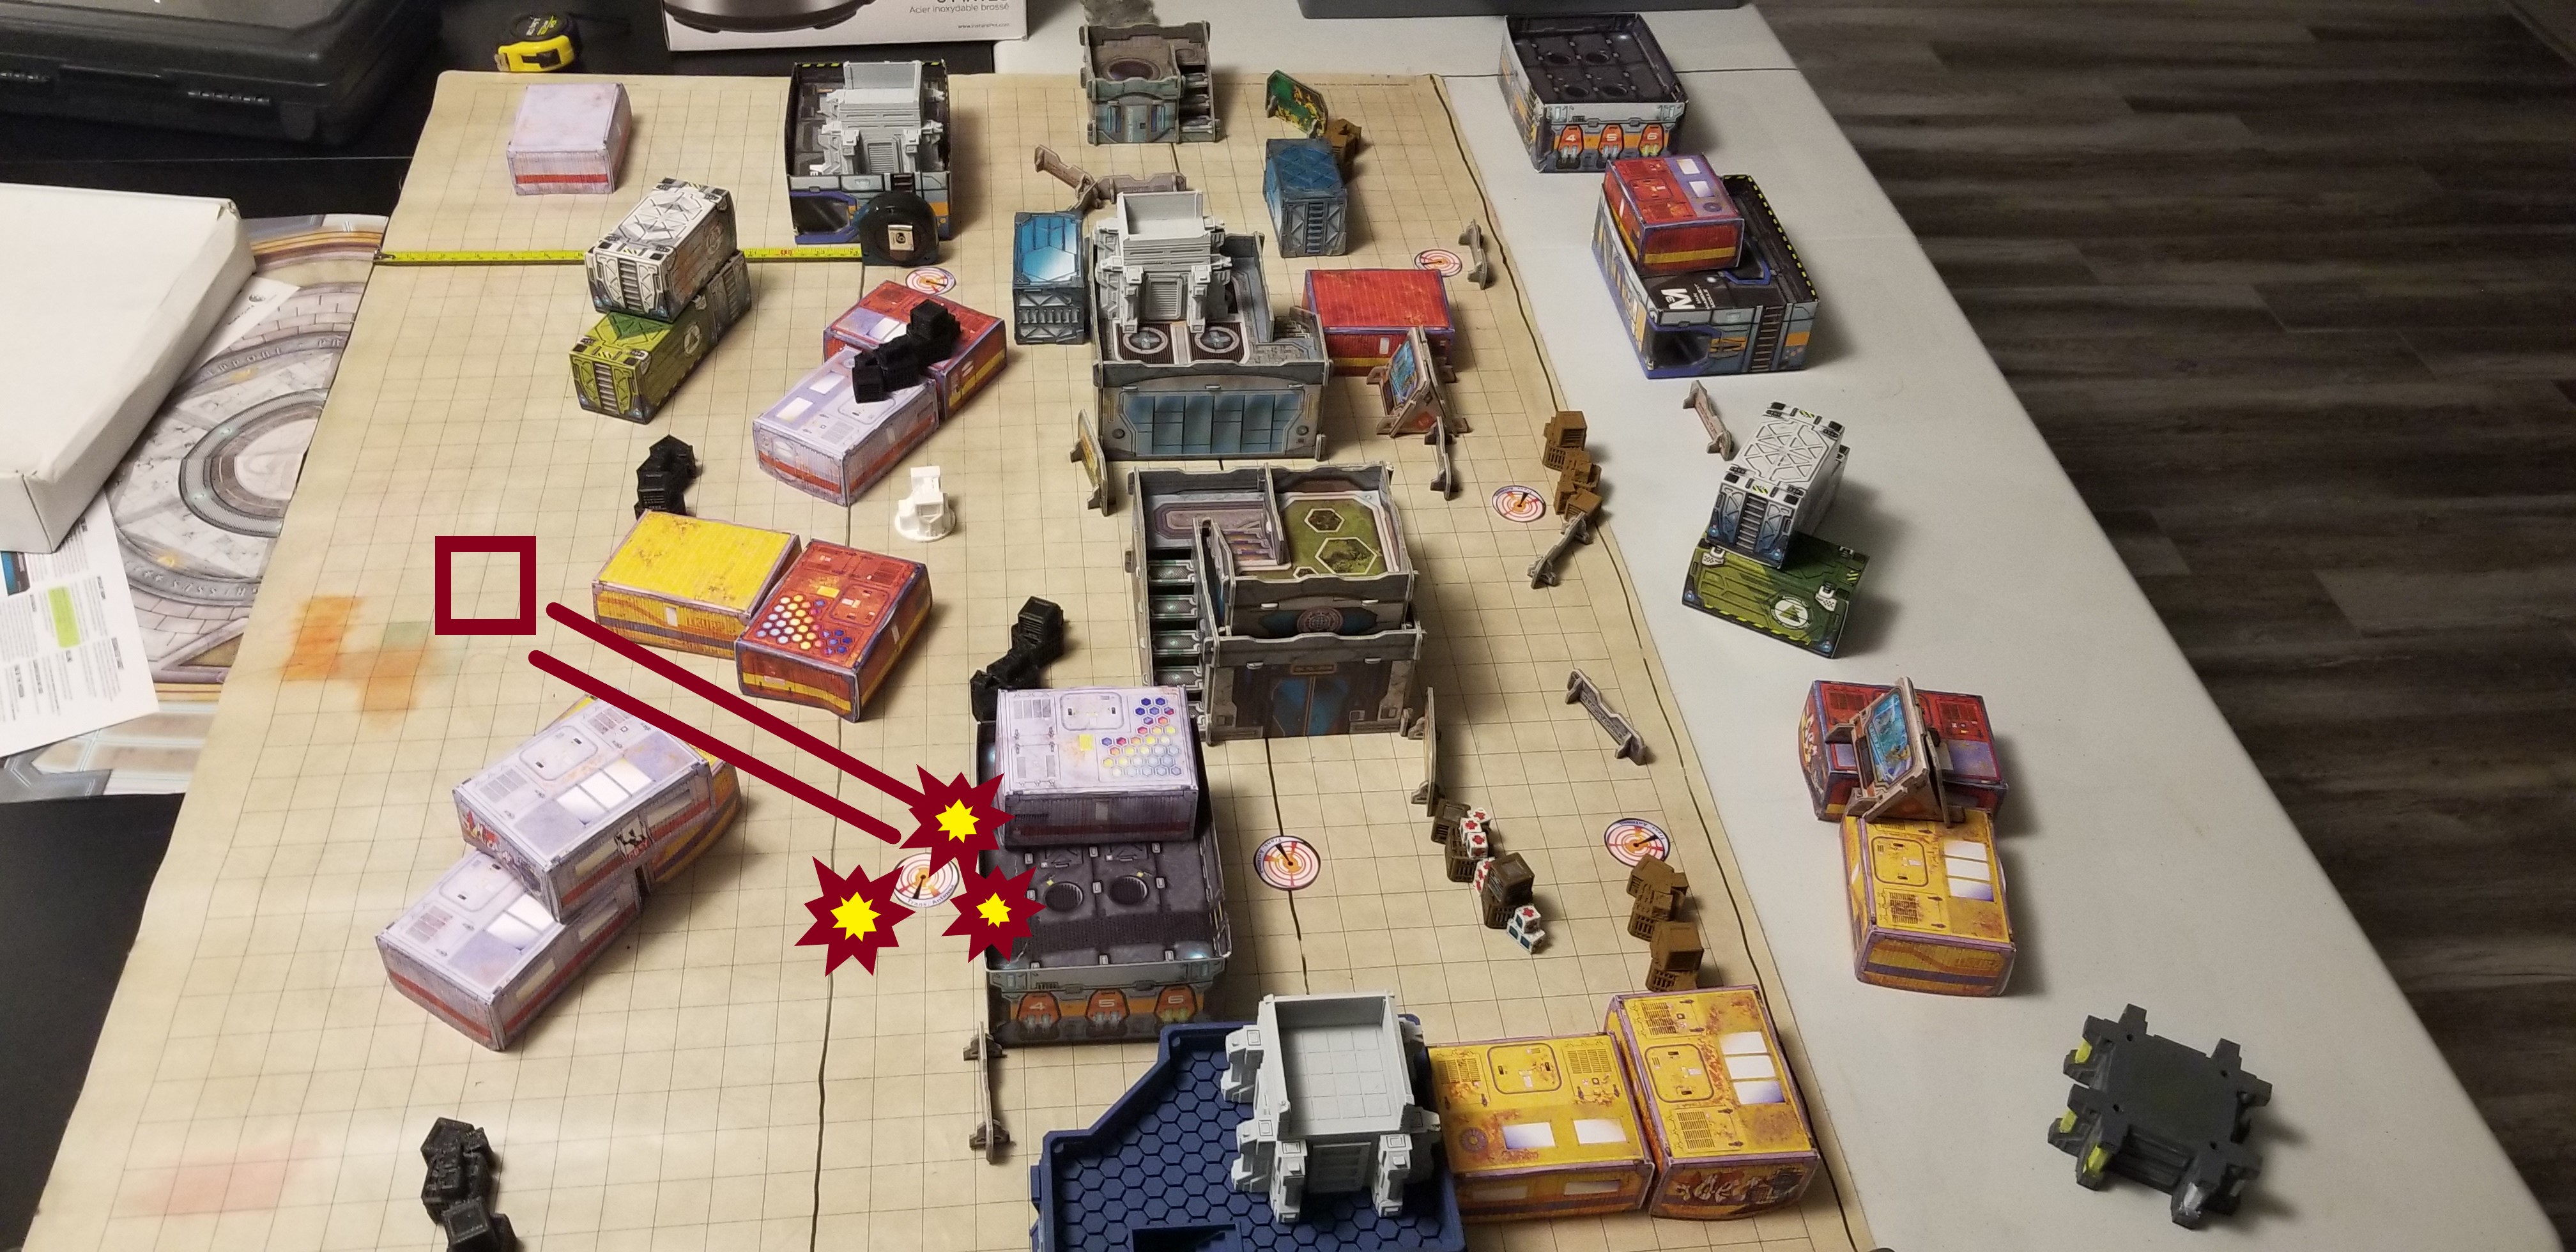 (Because no pictures were taken of it during the game) A Unidron ML moves backwards, and opens fire upon the rear left Antenna, destroying it!
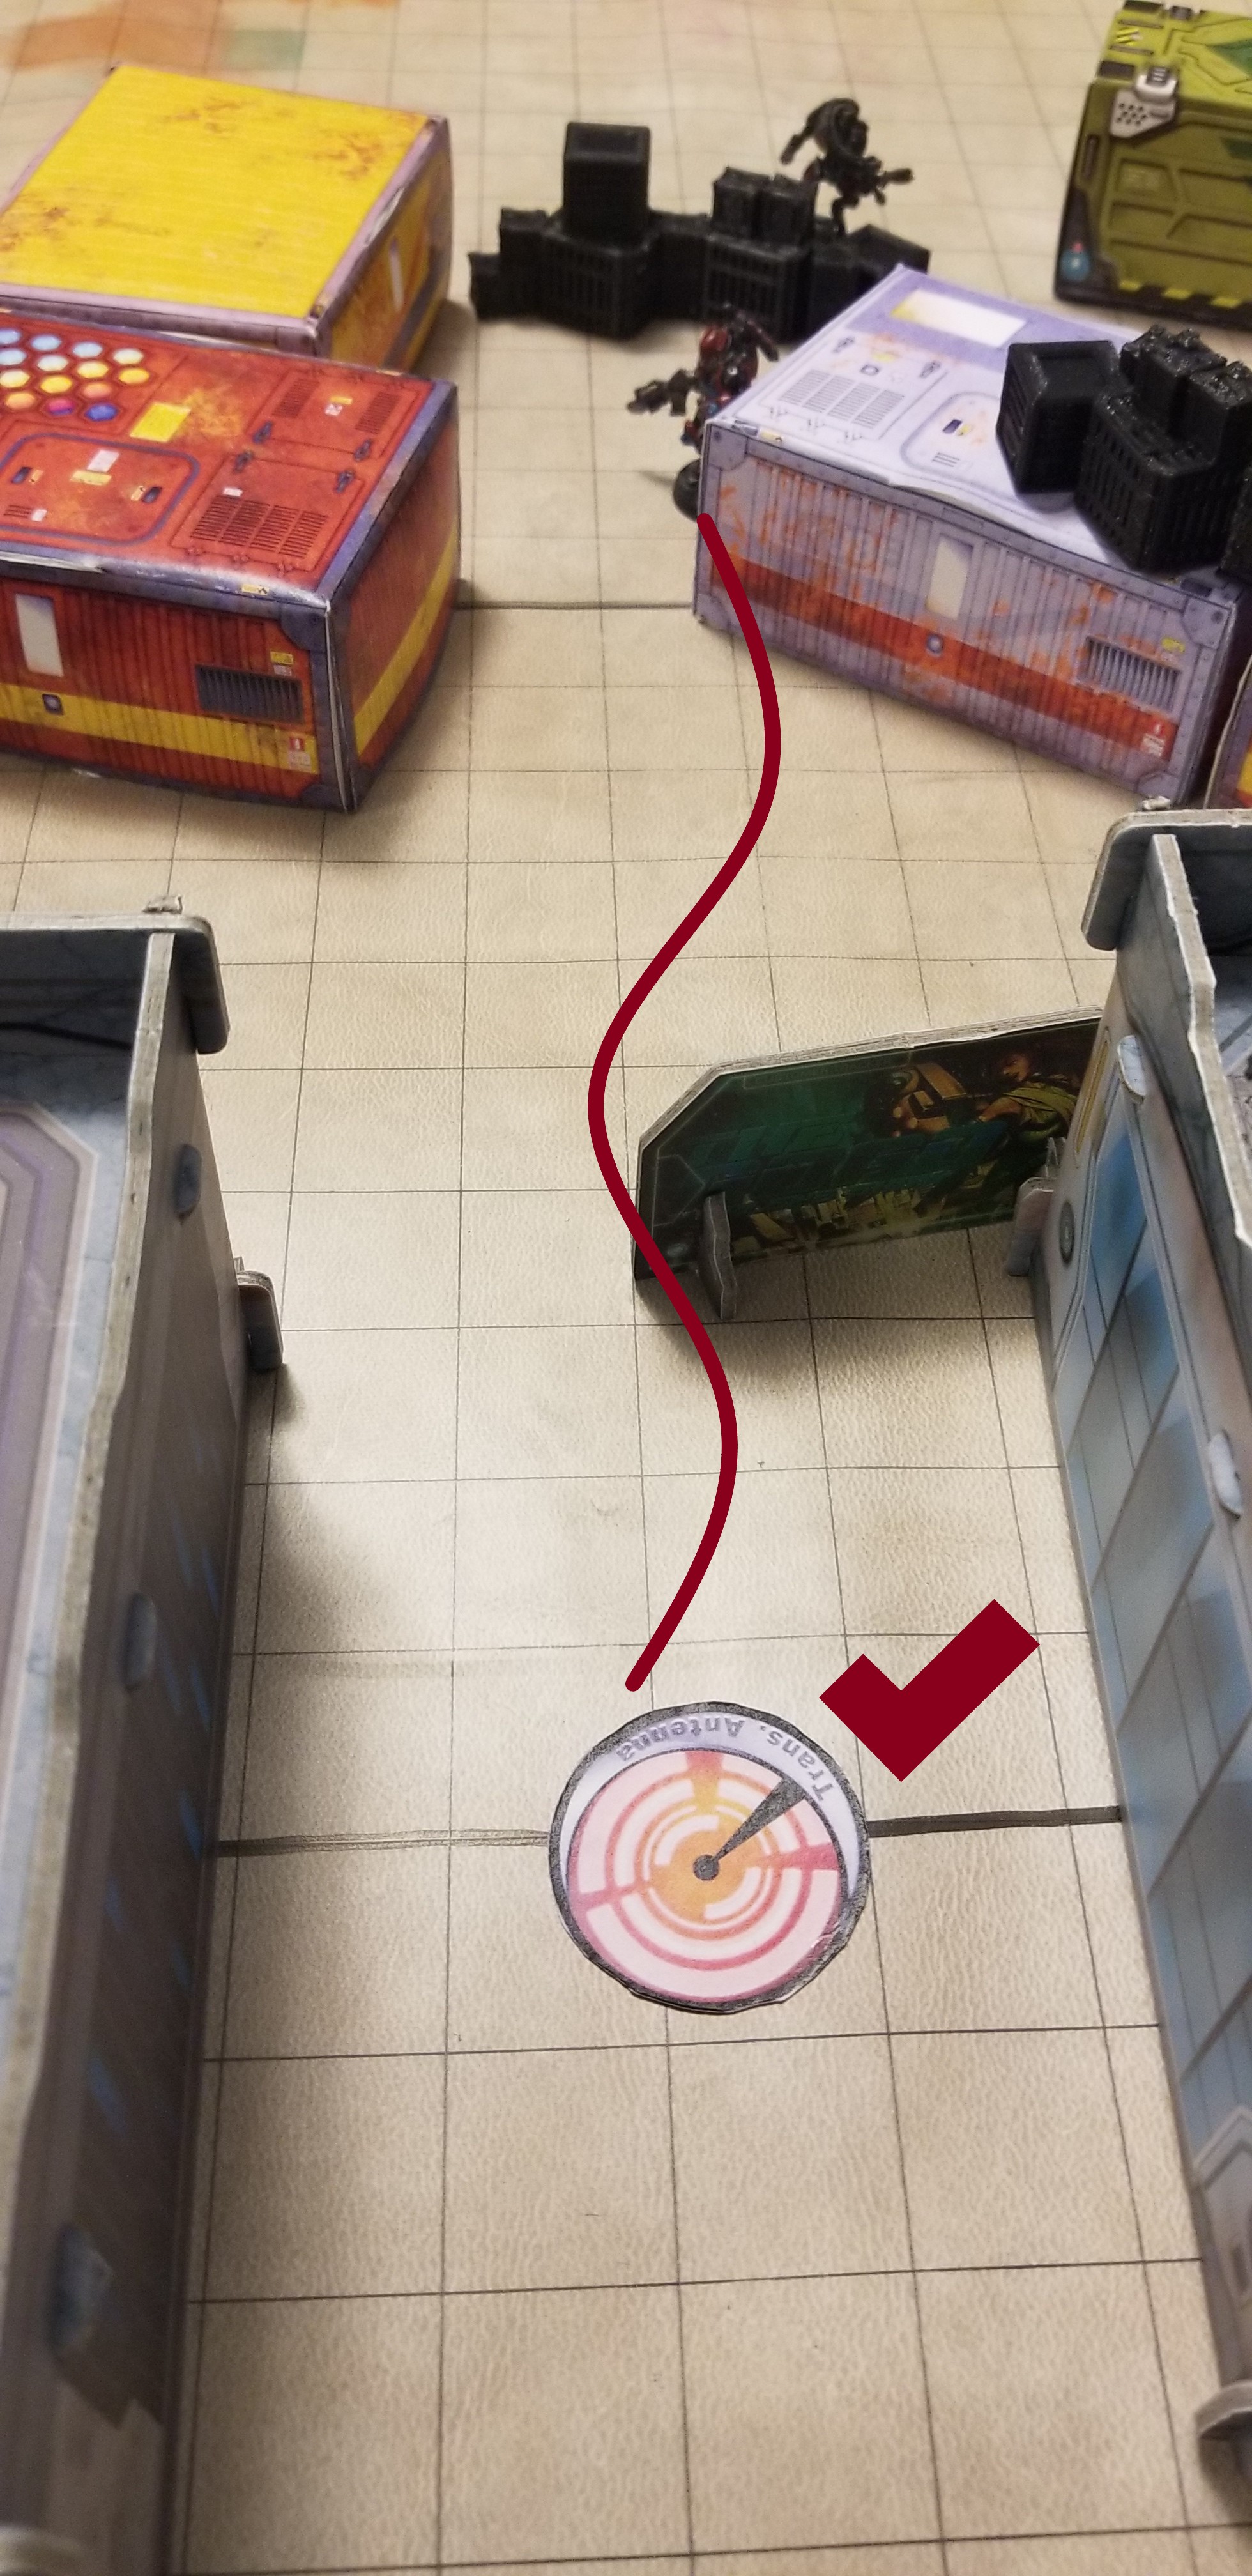 A Unidron Forward Obsver (Proxy: Rodok) moves forward, and with three orders left, claims the middle objective. Turning a tie, into a Combined Army Victory!
Berithh
-Have the same amount of Designated Antennas as the adversary at the end of the game (+2)
-To Kill the Designated Target [With Data tracker] (+4)
Corrick
-Have the same amount of Designated Antennas as the adversary at the end of the game (+2)
-To haave destroyed more Antennnas than the adversary at the end of the game (+3)
-To Kill the Designated Target [With Data tracker] (+4)
FINAL SCORES:
CORRICK: (9) - BERITHH (6)
"Lieutenant, what went wrong?" Command Berithh asked, standing behind his desk.
"The Combined Army Forces took us by surprise. While we relied on D-Charges, they brought in much heavier weaponry, and were able to destroy more antennas, depriving us of the opportunity to claim them." The Regular replied.
"Hmmm." Berithh began, "Our Aleph allies won't appreciate their data falling into the hands of the EI. For the time being, your squad is being reassigned to defend Liberty Cargo. I'll deal with the fallout from our allies. Dismissed."
The Regular saluted, and marched out of the door.
"Did you hear all of that?" Berithh asked, seemingly to no one.
"We did. Though the EI was able to attain some data, we were able to scramble a large portion of it, rending it mostly useless to the EI." a robotic voice replied over the intercom on Berithh's desk.
"Excellent." Berithh said, reaching for his cigarettes. "I'm going to make a call to Neoterra, and request additional forces. Any... manpower, provided by you would aid us greatly in the battles to come."
"We will muster some forces, and provide them to you, Commander."
With that, the comm line fell silent. Berithh lit a cigarette, taking a long drag from it, as he turned off the intercom.
Battle Report Author

Army Lists Used In This Battle
Recommend Commander For Commendation
Share this battle with friends
CorrickWins

Great report!
REally well done!
Terrific Report, the pictures really helped follow the battle. Great job.
♬✧ʕ•ૅૄ•ʔ Nice Report, good luck for next time
Great report man! Was a lot of fun seeing this from your perspective!