Fought At Main Strip: Harry’s Bar
1680 days 5 hours 18 minutes ago
Jhokalups – Field Operation Action Report – 36
Jurisdictional Command of Tunguska vs Military Orders
300/Asteroid Blues – Decapitation
This last week our game store had a little Asteroid Blues game night. As a group we were competing in Harry’s Bar. This would be my first game against Nico and against the Military Orders section of PanOceania. After a quick confirmation of what we were playing we headed to our table and rolled for lieutenant.
Wip Roll
Jurisdictional Command of Tunguska – 15
Military Orders – 7
Decision: Nico
Deployment: Jhokalups
Initiative: Nico
1st Turn: Nico
1st Deploy: Nico
Military Orders List:
https://army.infinitythegame.com/index.html?l=IwBgzAPmIhEExgKQE4BsSzwKxIITzyq5Yj4AsSA7FUvGihdbaRnrlQBx1VvAadGYUPmC5O3aNzzBuKYJmCUZchcOXwFKSsMYFquHNwACpoA=
Jurisdictional Command of Tunguska List:
https://army.infinitythegame.com/index.html?l=KwBgLAPgzCIQggIQAQBECmBjAhgBwsAKQCMIAnFIWCMcYQISknkAcVIUA7A06WW9TB1GIZv3ZCeovgPDCATGNFR+bRsxZlCKlqMaVaNCWrqlN2/ovVmtOq2DGLq4QgAF53WsSLVOANgZPch8aLXogshDiLVdXIA=
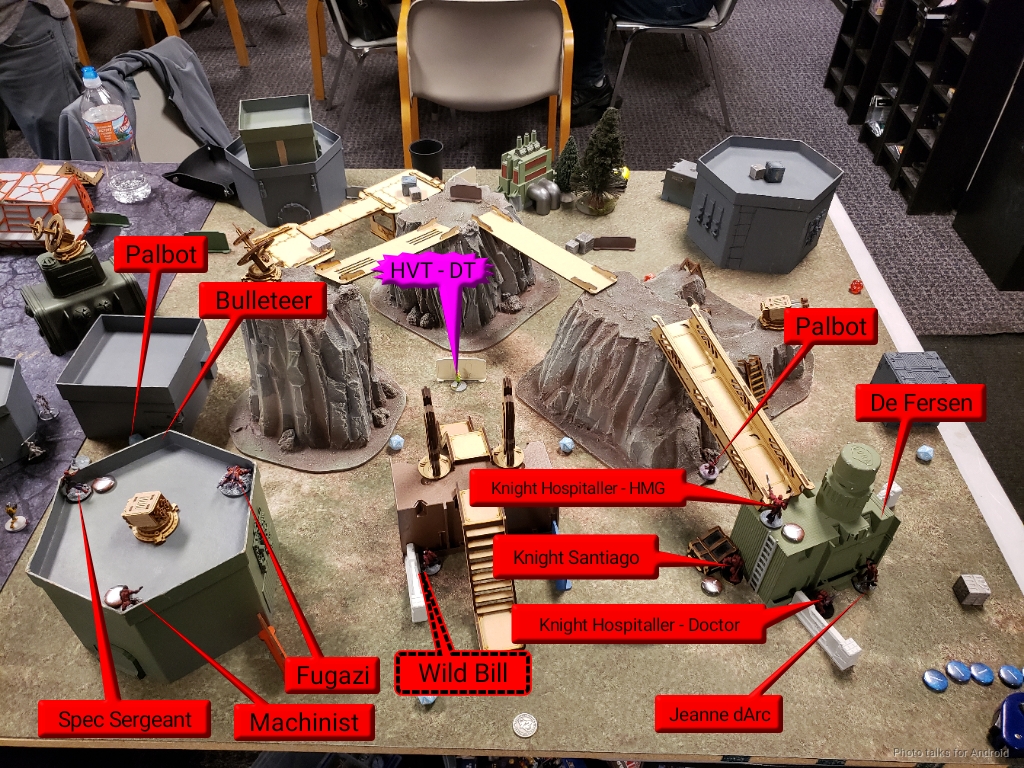
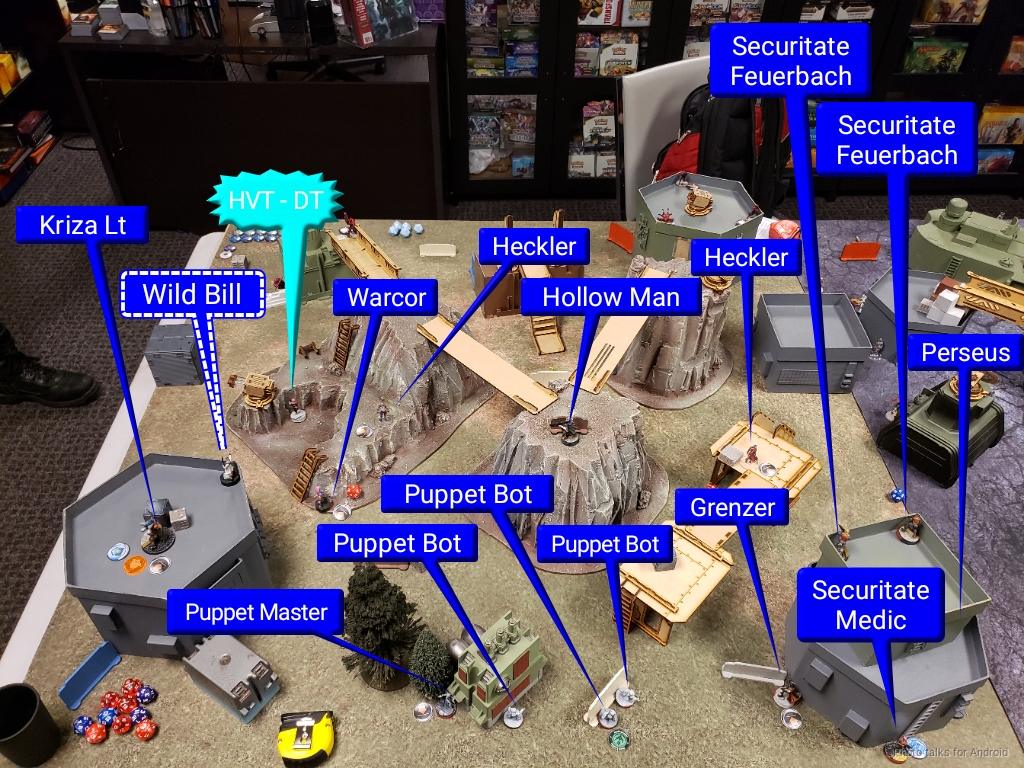
Our section of Novyy Bangkok seemed to have some active mining operations near the bar. With ramps up to the exposed rocks we would have some nice high places to shoot down from. Nico choose to go first, and I chose a side with what felt like a good set of sniping nests.
Deployment:
Nice set his support specialists up high on his left, guarded by a Fugazi. The Machinist had Palbots on the left and right. The Crusader fireteam on the right had a Hospitaller HMG up top of a building. The Wild Bill bot was set up centrally, ready to walk up and guard the Designmated Target that was located centrally. A Bulleteer came in on the left side as the reserve piece.
I set my Kriza and Bill bot on top of a building to my left, the Kriza had a nice short walk to be able to gun down the enemy HVT. I set my Designated target to be inside a little nook in one of the rock pillars. I set up a Warcor to be near the HVT and hopefully drag it back to a safer area. The Puppet bots guarded my back center, and I had a securitate link set up on the right. I had the Hollow Man Missile Launcher in reserve and set it up in the middle section on overwatch. I had two Hecklers up front ready to Isolate anything that walked by.
Top of 1: Nico – Military Orders
To start things off, Nico has the Spec Sergeant put up Assisted Fire on the Bulleteer. The Bulleteer then comes around the corner to take a couple shots at the Hollow Man, driving the Hollow Man down into cover. Then the Bulleteer came around the corner to take out my Securitate Feuerbachs one after the other. As the Bulleteer started to advance up after the rest of the link, the Heckler on the right attempts to jam it but fails. The Hospitaller HMG takes out the Heckler on my right before the Bulleteer continues to move up. As it’s moving the Puppet Bots attempt to Flash Pulse it, landing a crit success while the Bulleteer attempts to gun down it and Perseus. After retreating the Bulleteer with a coordinated order that also maneuvered De Fersen into a firing position, Nico passed turn.
Bottom of 1: Jhokalups – Tunguska
My first priority was to take out the Bulleteer. I used Persues and a smoke cloud to take out the Bulleteer in close combat. I then have my Kriza stand up and attempt to fight the HMG and De Fersen. I wind up taking a wound while forcing De Fersen down into cover. I attempt to have my Warcor snag the HVT and retreat out. But the HMG takes out the poor reporter. I move my Camo marker up to cover the HVT better, reposition the remaining members of the link team, and then passed turn.
Top of 2: Nico – Military Orders
Nico has the Hospitaller HMG takes out the Designated target. It then walks up to attack the Hollow Man. After knocking out the Hollow Man the HMG retreats. I miss a couple opportunities here to attempt to jam the Hospitaller. Nico then spends quite a few orders having De Fersen walk up to take out my Heckler camo marker, before retreating behind a building.
Bottom of 2: Jhokalups – Tunguska
I activate my Kriza and have him gun down the HMG. The Kriza then walks around the corner and takes out the Fugazi. After driving De Fersen into hiding the Kriza takes out the Designated Target. I spend a few orders advancing the Puppet Bots up to mid field and pass turn.
Top of 3: Nico – Military Orders
Nico has De Fersen come forward and take out the Kriza at a closer range. Then the Wild Bill bot comes up to guard the middle. Nico passes turn.
Bottom of 3: Jhokalups – Tunguska
In a foolish plan I spend all my orders to try and bring the paramedic over to heal the Kriza. When the paramedic cannot get far enough, I pass turn. Having taken out my Designated Target, my lieutenant and more army points, the game ends in a:
Final Score: 10 – 3 Military Orders Total Victory
Lessons Learned:
I feel like I had two big mistakes this game. At the end of my second turn, I had no reason to leave my Kriza standing. I got distracted from the mission and left my lieutenant exposed and in danger, when there was no reason to do so. I also wasted my second turn on a long shot, when I could have had the Puppet Bots go on a small rampage with my remaining orders. It was an interesting experience, and I look forward to playing Nico again.
Battle Report Author

Army Lists Used In This Battle
Recommend Commander For Commendation
Share this battle with friends
NicoWins

Good Job. Nice Pics
Thanks Santyago, hopefully I’ll do better next time.
One take away when playing PanO, don’t let PanO play their game… which is shooting things on their turn.
It was a good fight, cheer up!
#GoGoBromad!